“Blending” is the way to combine layers and show them on the canvas. By changing [Blending], you can apply various effects to the image. In this section, we explain the case of changing upper layer’s [Blending] on the condition of lower layer with 100% opacity.
To calculate the result of [Blending], the real values of RGB (0〜255) are converted to values between 0 and 1. For example, black (R=0, G=0, B=0) is treated as (0, 0, 0), 50% gray (128, 128, 128) as (0.5, 0.5, 0.5), and white (R=255, G=255, B=255) as (1, 1, 1).
Normal
Colors of the upper image are rendered regardless of the RGB value of the lower image.
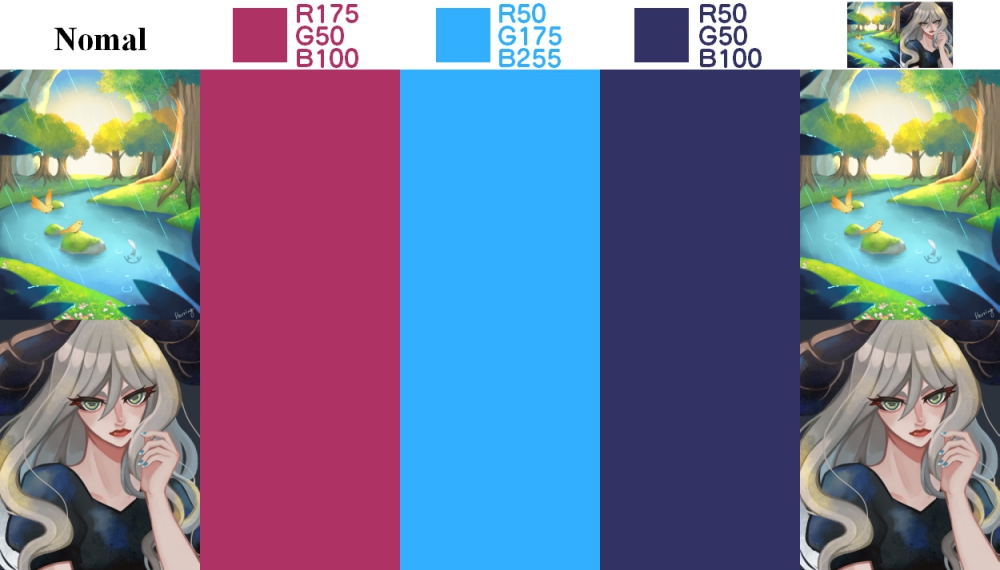
Multiply
The RGB value of the lower image is multiplied by the RGB value of the upper image. If the upper color is black (R=0, G=0, B=0), it will be multiplied by 0 so the lower image will be black (0, 0, 0). Conversely, if the upper color is white (R=1, G=1, B=1), the lower image will be the same color as the original because it is multiplied by 1.
Basically, since the values are multiplied by a number less or equal to 1, the image on the canvas will be darker and closer to black than the RGB values of the original image. On account of this reason, a layer with [Multiply] is often used when users want to apply a color darker than the original, such as a shadow.
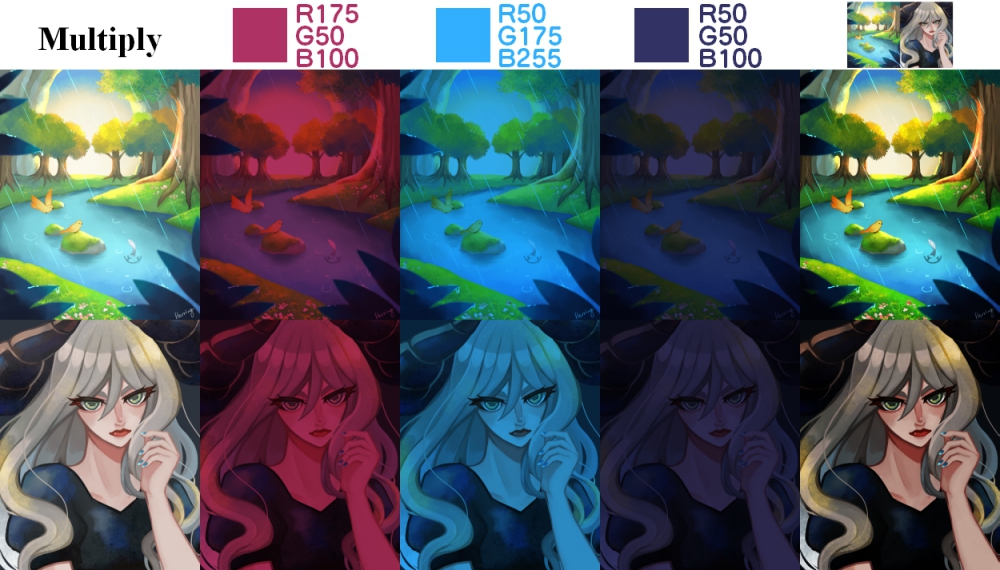
Add
The RGB value of the upper image plus the RGB value of the lower image is the new RGB value. If the added value is greater than 1, it becomes 1. Therefore, as brighter colors (colors with higher RGB values) are painted over, they become closer to white. This is effective for expressing strong light because it produces an effect similar to halation in photographs.
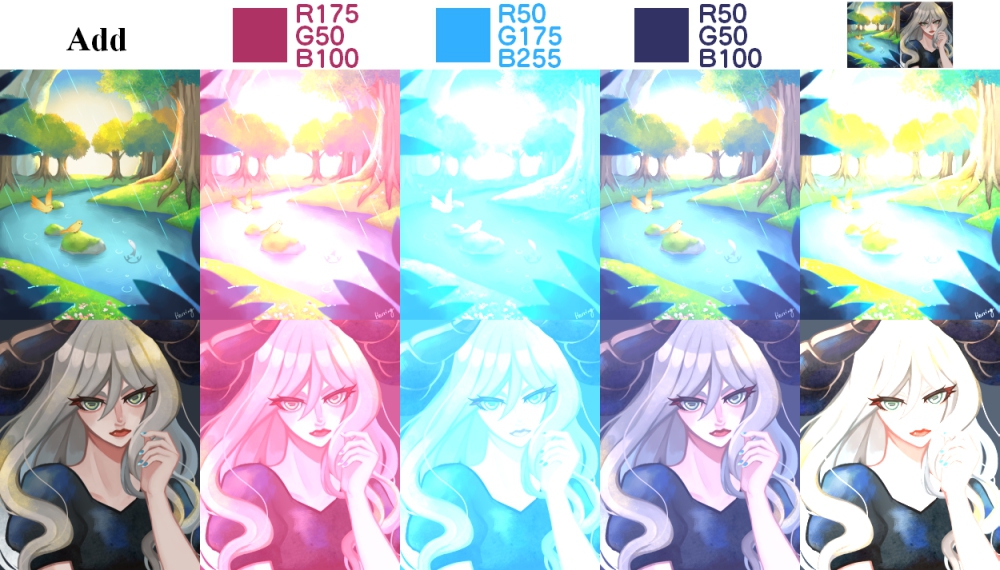
Subtract
The RGB value of the lower image minus the RGB value of the upper image (subtraction) is the new RGB value. If the subtracted value is negative, it is set to 0. Therefore, the more bright colors (colors with high RGB values) are painted over, the closer to black they are. This function can be used when users want to reduce certain colors in an image.
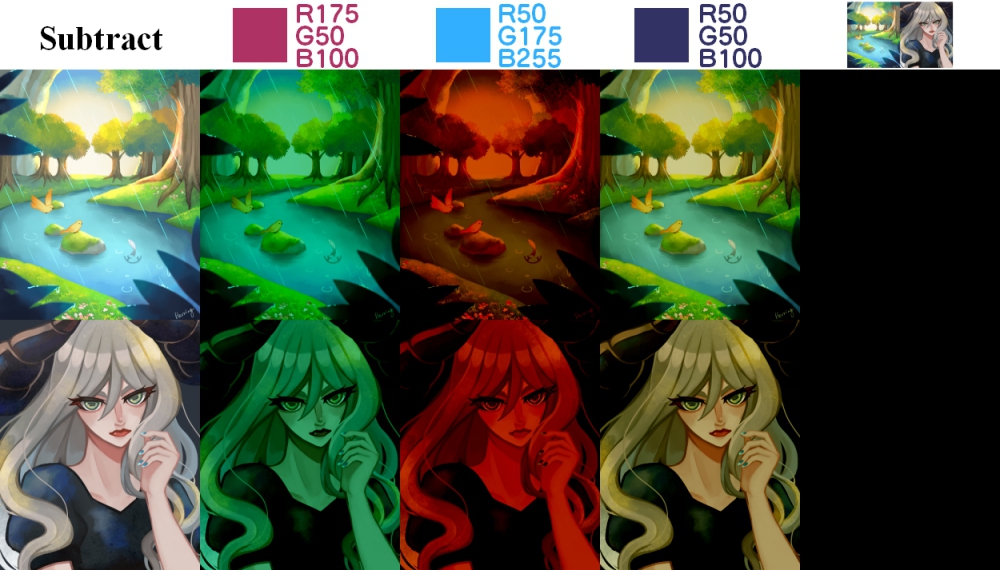
Divide
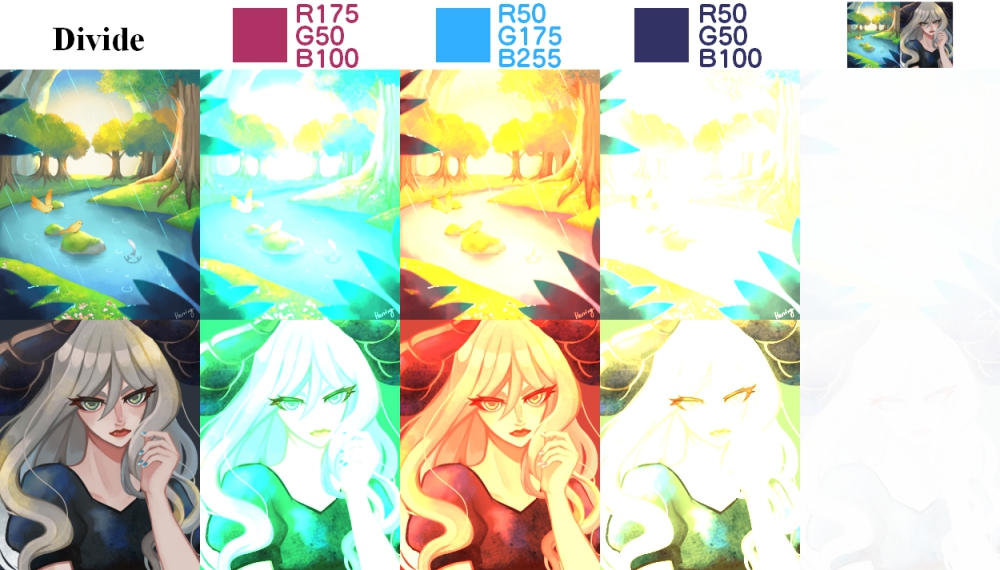
The RGB value of the lower image divided by the RGB value of the upper image (division) is the new RGB value. If the divided value is greater than 1, it is set to 1. Therefore, if a darker color (a color with a lower RGB value) is painted over, it will be closer to white.
This is especially useful when you want to remove yellow stains from an imported analog illustration. To do it, with eyedropper subtract color which you want to change to white, add new layer (Blending: [Divide] ) and fill it.
Overlay
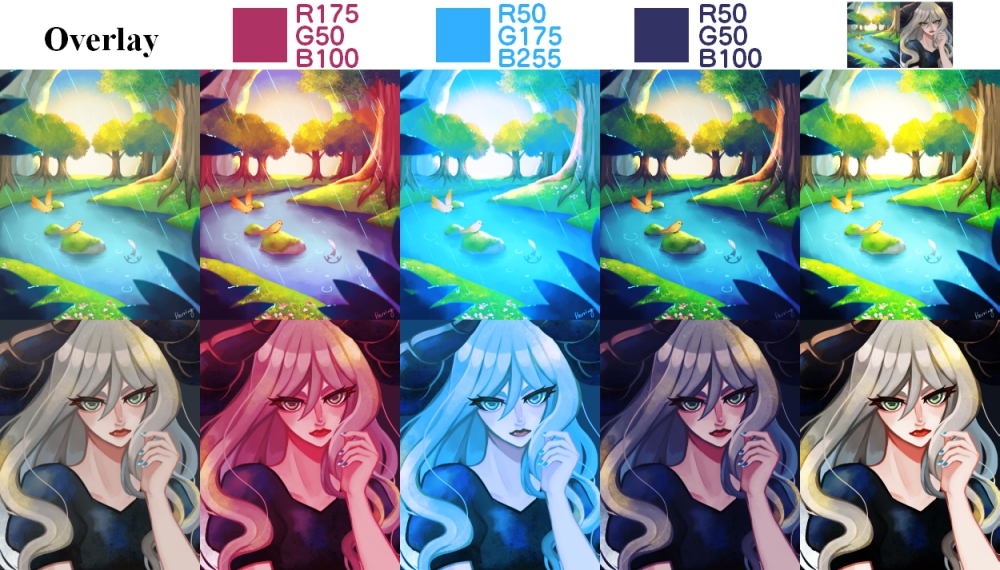
About the RGB value in the lower image, [Multiply] is applied to elements less than 0.5 and [Screen] is applied to elements greater than 0.5. For example, when the RGB value of the lower color is “R=100, G=200, B=100,” [Multiply] will be applied to the R and B values and [Screen] to the G value. When the above layer is filled with single color, the [Multiply] effect is applied to the dark areas of the lower image and the [Screen] effect is applied to the light areas, thus changing the overall atmosphere while maintaining the color balance of the original image.
Screen
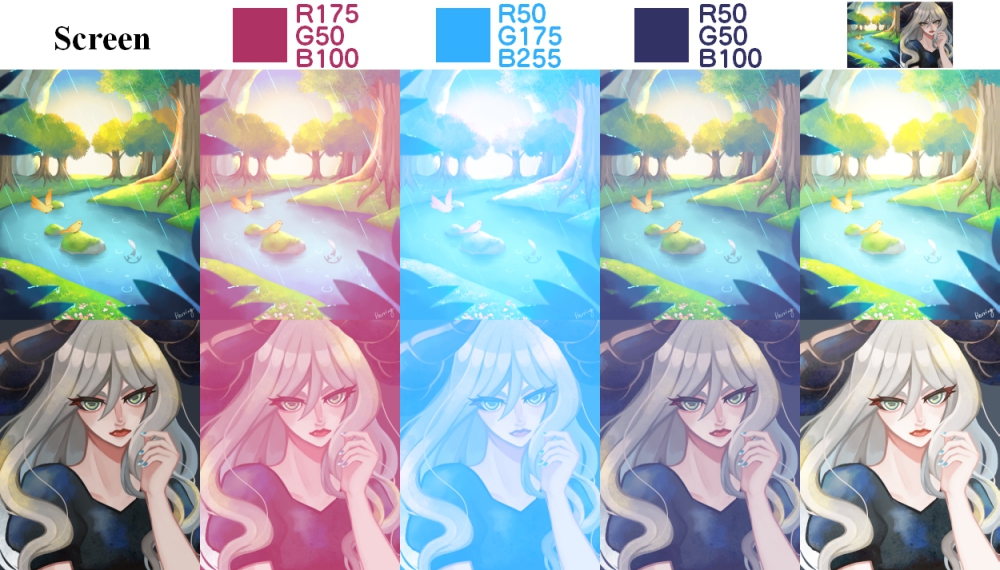
The value, which comes from the RGB value of the inverted color of the lower image multiplied by the RGB value of the inverted color of the upper page, is inverted, which is the new RGB value. The brighter (higher RGB value) colors of the upper and lower image are, the closer they are to be white. If one of them is white, the all will be white. It is similar to [Add] that brightens the color of the original image, but more mild and less white.
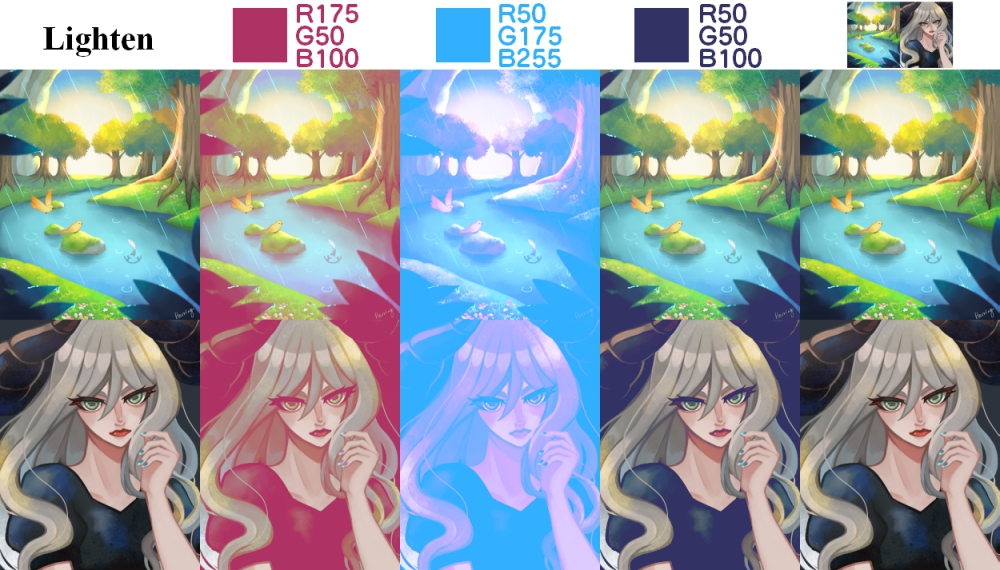
Lighten
Comparing the upper and lower images, the brighter (higher value) RGB value will be picked up.
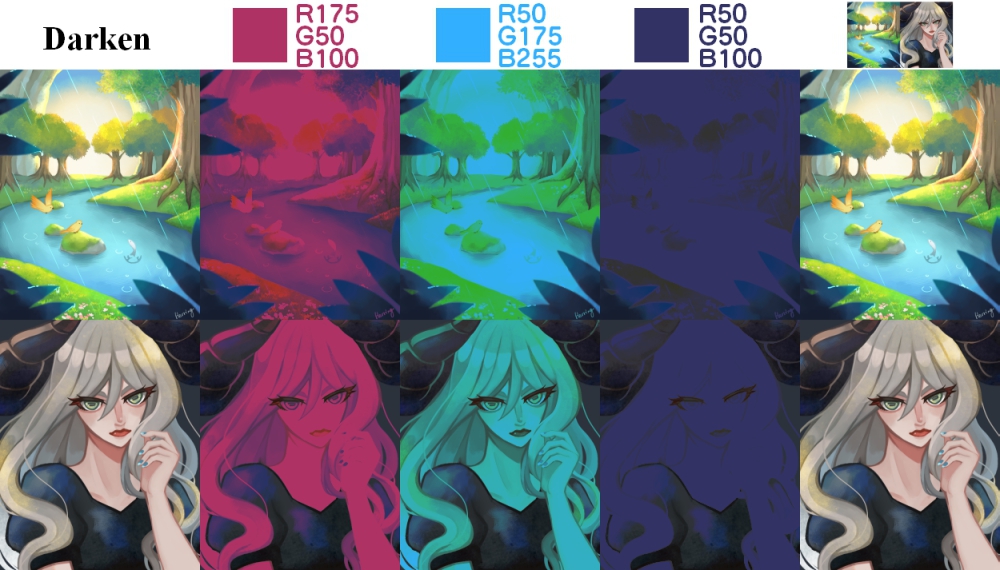
Darken
Comparing the upper and lower images, the darker (lower value) RGB value will be picked up.
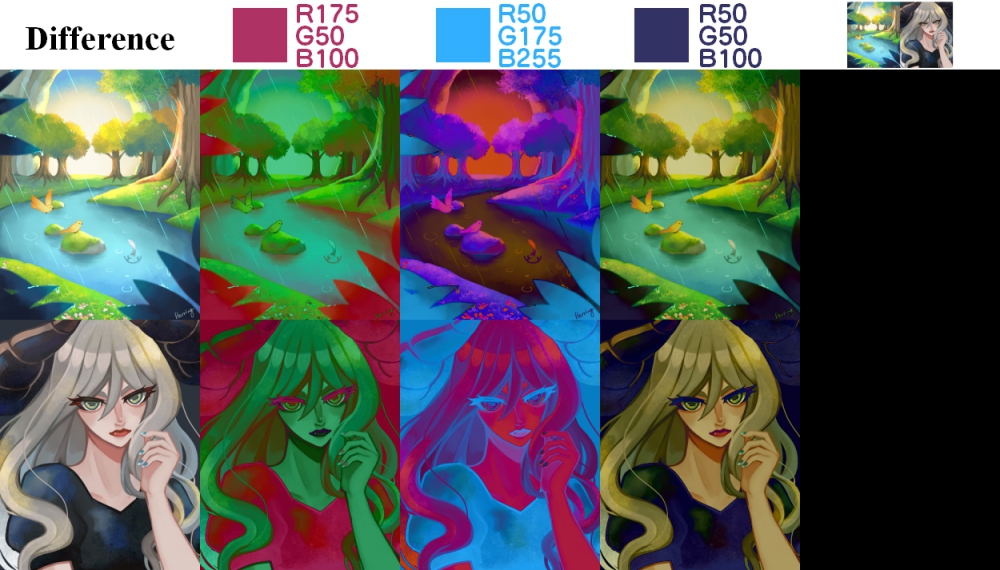
Difference
The absolute value of the RGB value of the lower image minus the RGB value of the upper image (difference) is the new value. If the color of the upper layer is darker (lower RGB value), the change will be little; if it is lighter (higher RGB value), the change will be more, as if the original colors were inverted. If the same color as the original is used to paint the image, it will be black (R=0, G=0, B=0), which can be used to check the difference between the original and the new image.
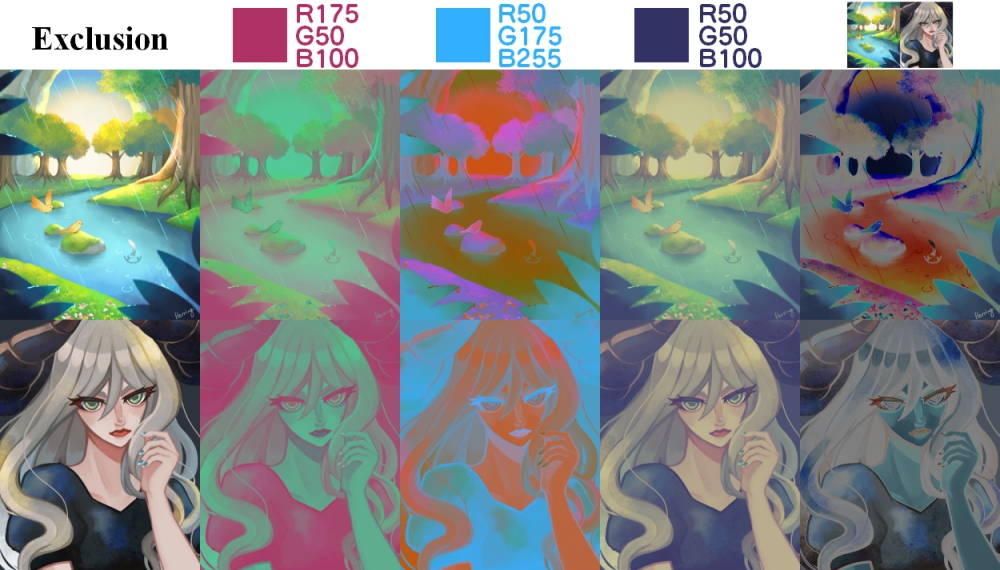
Exclusion
The RGB value of the inverted color of the upper image multiplied by the RGB value of the lower image, then plus the RGB value of the upper image multiplied by the RGB value of the inverted color of the lower image, leads to the new value. If the upper color is black (R=0, G=0, B=0), the lower image will remain unchanged; if it is 50% gray (0.5, 0.5, 0.5), it will be 50% gray; if it is white (R=1, G=1, B=1), the lower image will be inverted. The overall effect is similar to when [Difference] is applied lightly.
Color Dodge
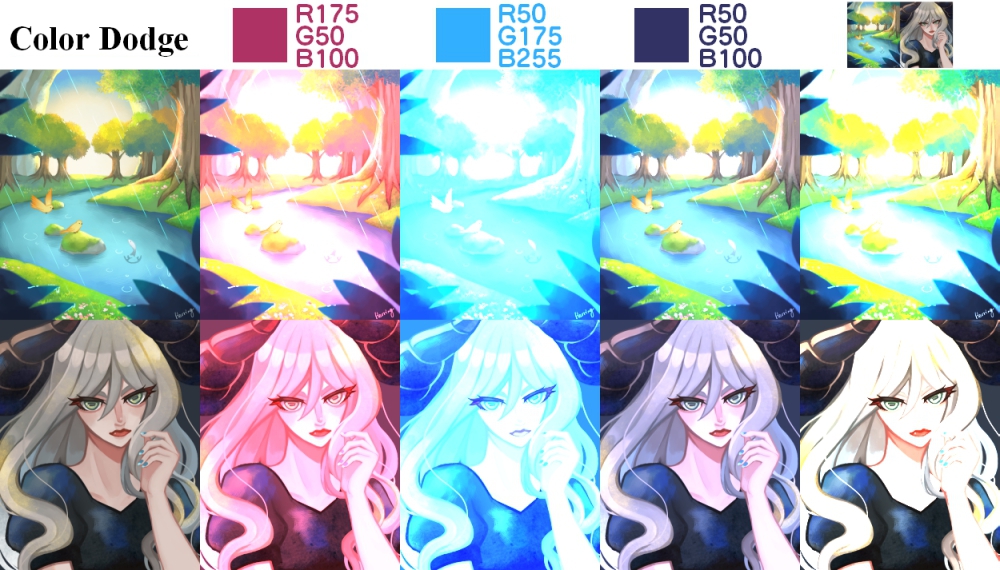
The RGB value of the lower image divided by the RGB value of the inverted color of the upper image is the new value (a value greater than or equal to 1). Usually the result is brighter than the original color, similar to the “dodging” effect in a photograph.
Color Burn
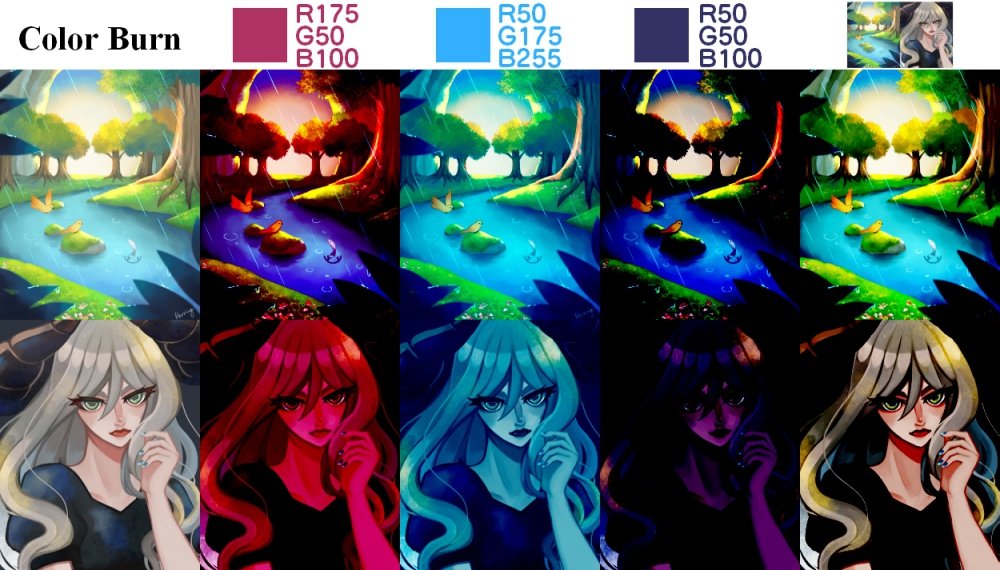
The value, which comes from the RGB value of the inverted color in the lower image divided by the RGB value of the upper image, is inverted, which is the new value (values below 0 are set to 0). Usually the result is darker than the original color, similar to the “burn” effect of a photograph.
Linear Burn
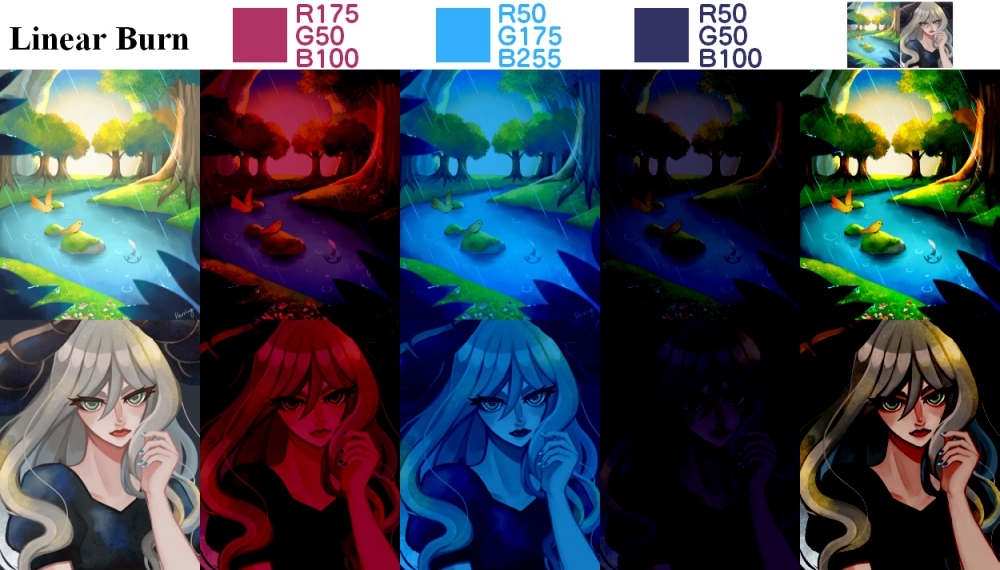
The value, which comes from the RGB value of the inverted color of the lower image added by the RGB value of the inverted color of the upper image, is inverted, which is the new value (values below 0 are set to 0). The original color will be darkened more evenly than in [Color Burn].
Soft Light
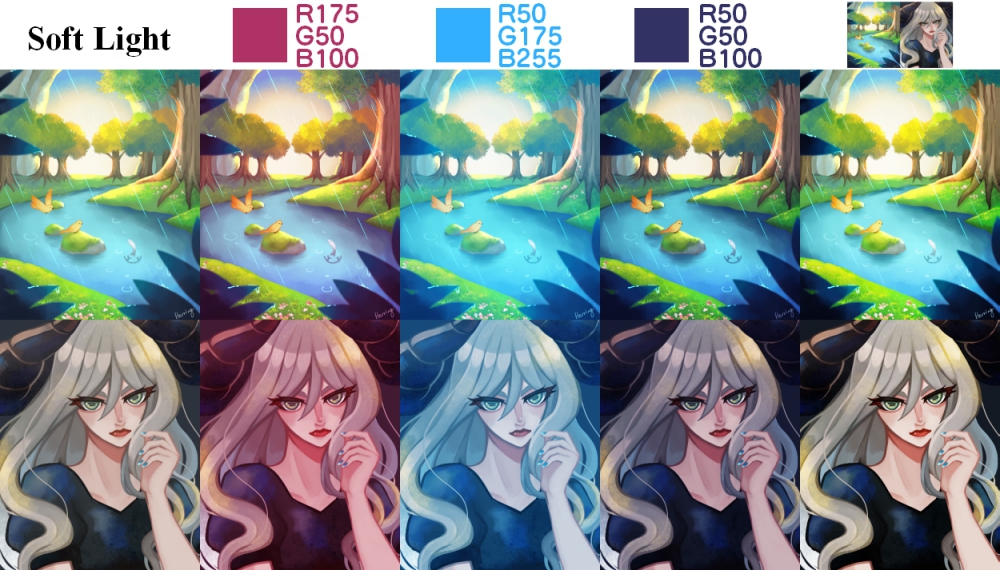
For the RGB value of the upper image, about elements with less than 0.5 is applied [Multiply] at about 50%, and about elements with greater than 0.5 will be applied [Screen] at about 50%. The overall effect is similar to that of [Overlay] applied at 50% opacity. If the lower image is black or white, or the upper image is 50% gray (0.5, 0.5, 0.5), the lower color will not change at all.
Hard Light
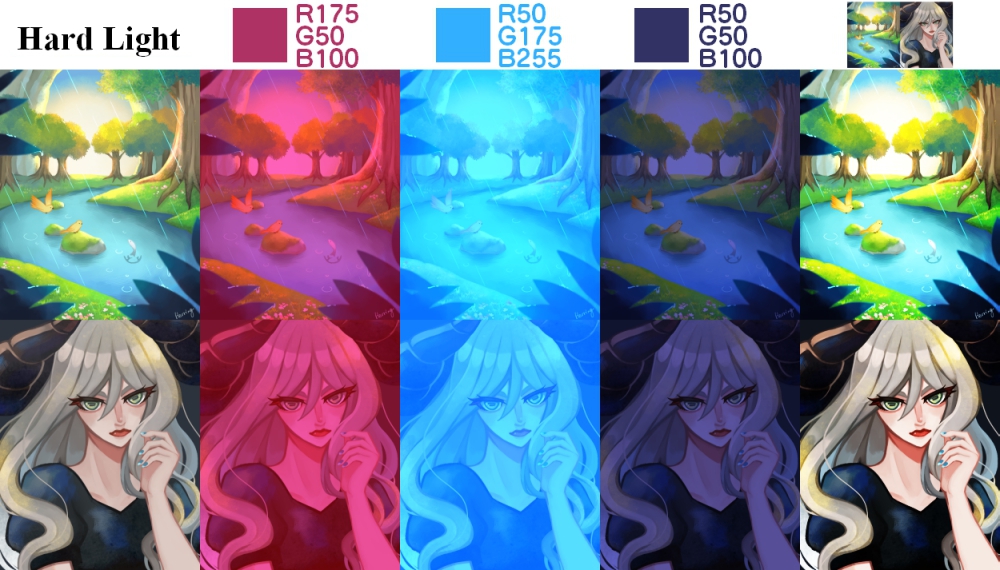
About the RGB value in the upper image, [Multiply] is applied to elements less than 0.5 and [Screen] is applied to elements greater than 0.5. This is the same process as [Overlay], but the effect of the upper color is stronger than [Overlay], which is based on the color of the lower image, making it useful for drawing effects.
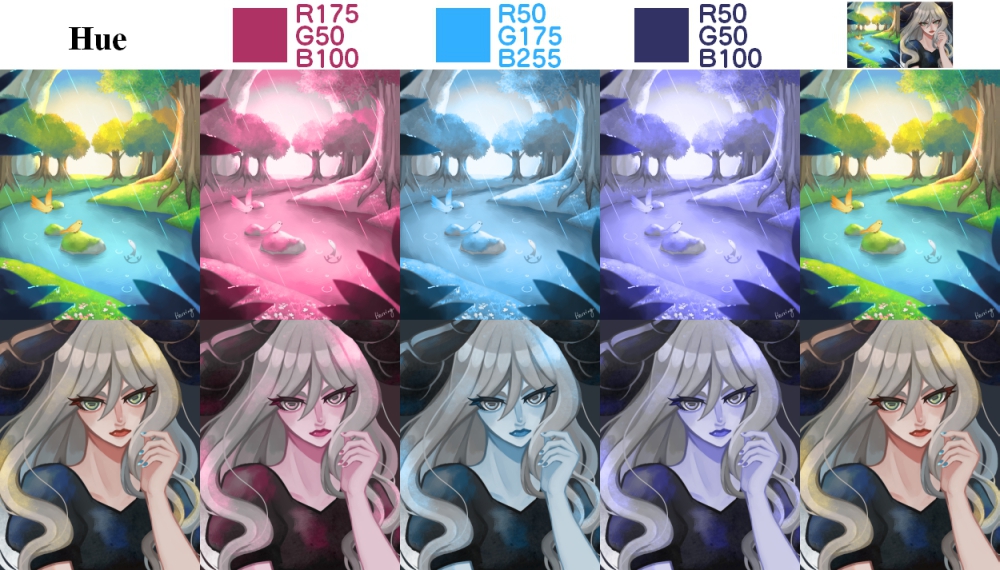
Hue
The hue value of the lower image is replaced by the hue value of the upper image.
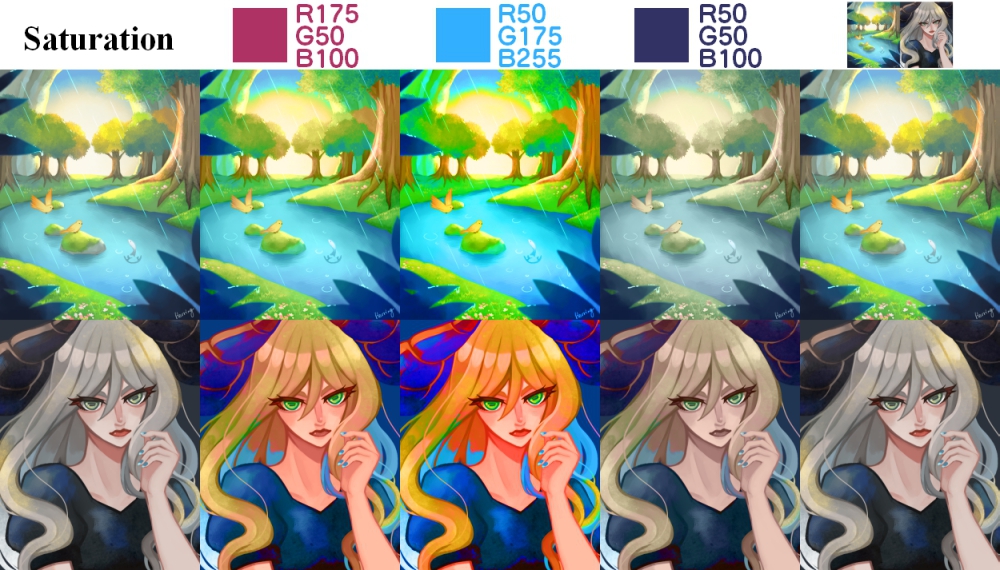
Saturation
The saturation of the lower image is replaced by the saturation of the upper image.
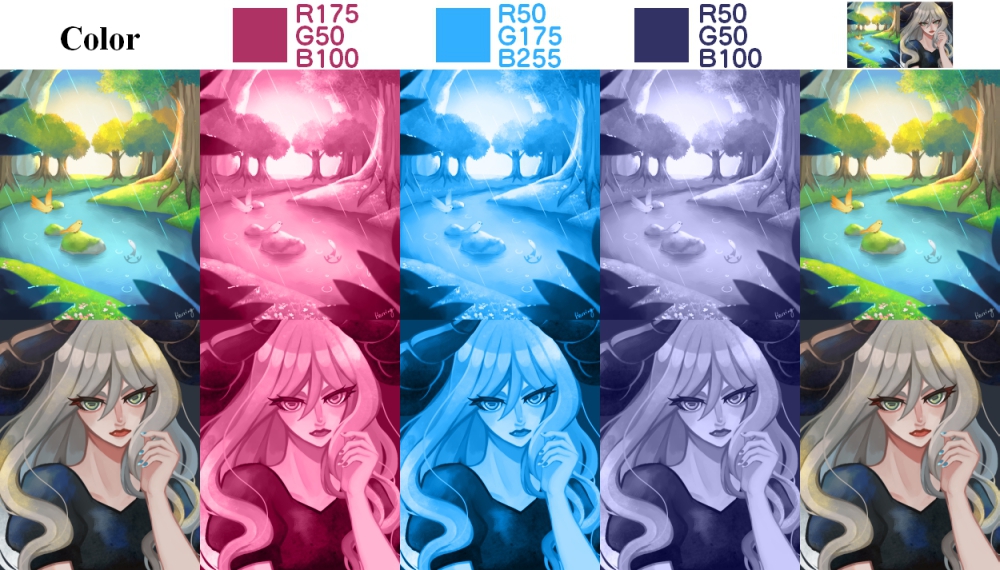
Color
The color of the lower image is replaced by the hue and saturation of the upper image. The result is more unified than [Hue] because the saturation value is also changed.
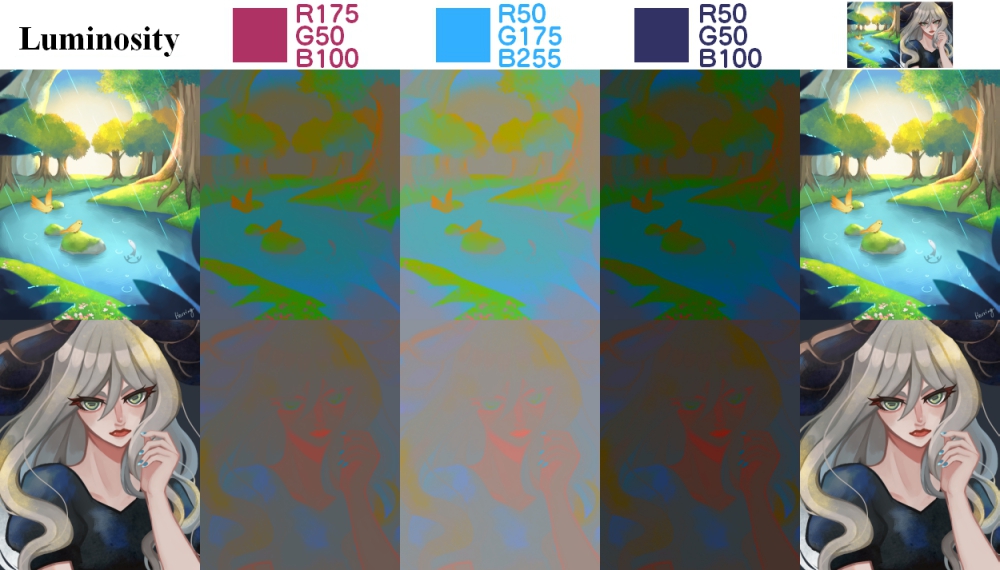
Luminosity
Luminosity in the lower image is replaced by luminosity in the upper image.
Pass Through
This blending is available only for layer folders.
When [Blending] of a layer folder is set to [Pass Through], [Blending] of layers in the folder will be applied to the layers below the folder. If you set [Blending] to other than [Pass Through], the [Blending] of layers within a folder will be effective only within the folder.
In the case of [Normal]
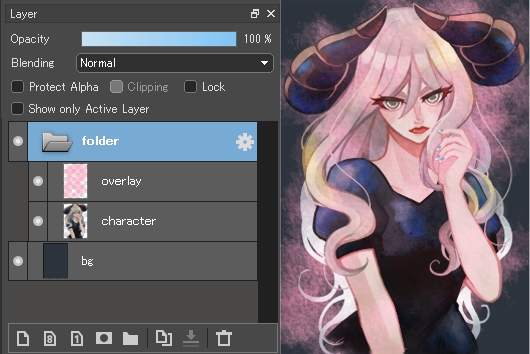
The effect of [Overlay] in a folder is applied only to the part of the image in the folder, and on the layers below the folder is the folder’s [Blending] applied (in this case [Normal]).
In the case of [Pass Through]
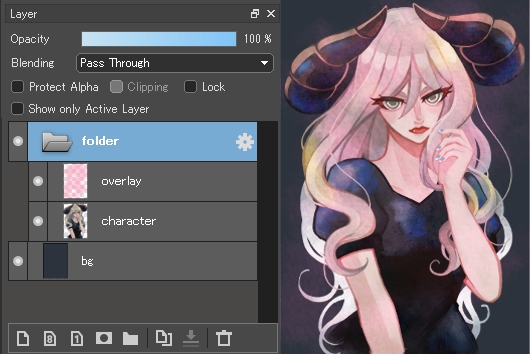
The effect of [Overlay] in the folder is also applied in the layers below the folder.
BACK TO TOP


