[File] menu is home to commands that let you create a new document, save a file, set up the work environment, and so on.
- New
- Create New from Template
- New via Clipboard
- Open
- Open Recent File
- Open Recent Folder
- Open As a New Layer
- Open the Auto Backup Folder
- Save
- Save As
- Export As (Specify Date)
- Export
- Export (CMYK format PSD)
- Export (ICO)
- Export (Base64/PNG)
- Export Animation (Animated GIF)
- Export Animation (APNG)
- Time-lapse
- Rasterize
- Export Layers
- Environment Settings
- Brush Environment Settings
- Select Pen Pressure API ※Windows Only
- Shortcut Settings
- Close
New
Open [Create New Image] dialog box.
In the dialog box, there are 3 tab; [Standard], [Comic], and [Animation].
1.Standard
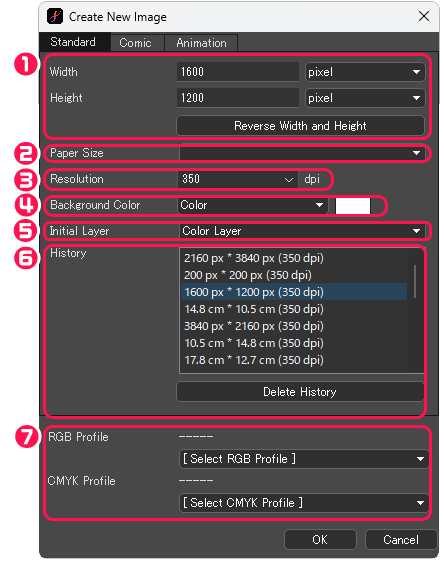
①Width / Height : Enter the campus size. (1 pixel min. to 20000 pixel max.)
Select the unit (pixel, cm, or inch) from the pull-down menu on the right.
Click [Reverse Width and Height] to swap [Width] and [Height] values.
②Paper Size : Choose the paper size from preset.
③Resolution : Choose the resolution either 350 dpi or 600 dpi.
Dpi (dot per inch) is the number of pixels allocated to 1 inch. (2.54cm)
④Background Color : Choose background color either white or transperent.
⑤Initial Layer : Choose layer type either [Color Layer] or [8-bit Layer].
⑥History : Recent canvas sizes are recorded. Click to apply [Width] and [Height]. You can select the history to delete from the list.
⑦RGB Profile / CMYK Profile : Choose RGB Profile and CMYK Profile. (Not necessary)
2.Comic
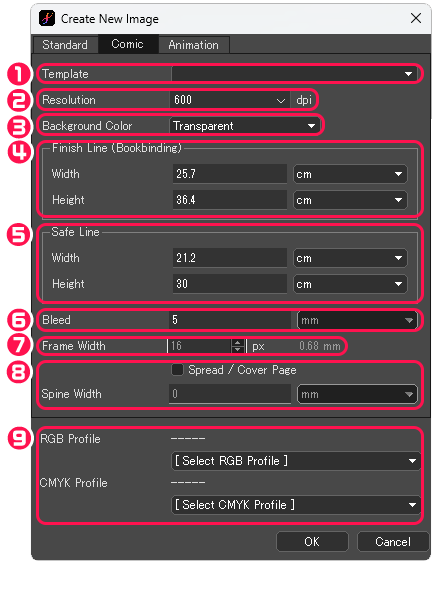
①Template : Choose the paper size from preset.
②Resolution : Choose the resolution either 350 dpi or 600 dpi.
③Background Color : Choose background color either white or transperent.
④Finish Line (Bookbinding) : Set the canvas outer frame width and height. Values will be automatically entered by selecting the template.
⑤Safe Line : Set the canvas inner frame width and height. Values will be automatically entered by selecting the template.
⑥Bleed : Set the length of bleed for printing.
⑦Frame Width : When you select [Yonkoma (4-frame)] under template, the frame width can be specified.
⑧Spread / Cover Page / Spine Width : When [Spread / Cover Page] is checked, the spread / cover page will be generated. To create a spread page, set the [Spine Width] value 0.
⑨RGB Profile / CMYK Profile : Choose RGB Profile and CMYK Profile. (Not necessary)
3.Animation
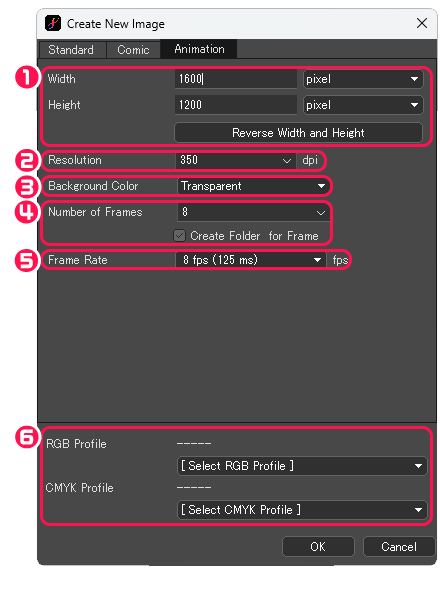
①Width / Height : Enter the campus size. (1 pixel min. to 20000 pixel max.)
Select the unit (pixel, cm, or inch) from the pull-down menu on the right.
Click [Reverse Width and Height] to swap [Width] and [Height] values.
②Resolution : Choose the resolution either 350 dpi or 600 dpi.
③Background Color : Choose background color either white or transperent.
④Number of Frames : Specify the number of layers at creating the canvas initially. When [Create Folder for Frame] is checked, the number of folders with frames will be created.
⑤Frame Rate : Specify the frame rate (fps) at replay.
⑥RGB Profile / CMYK Profile : Choose RGB Profile and CMYK Profile. (Not necessary)
Create New from Template
Click to open [New Template] dialog box, where you can download any template.
[New Template] dialog box

Click [Open template] to open each MDP file.
New via Clipboard
When an image is on the clipboard, a new canvas will be created with the image. When multiple layers or layer folder are on the clipboard, open [Clipboard Selection] dialog box.
[Clipboard Selection] dialog box
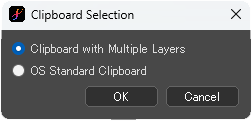
When [Clipboard with Multiple Layers] is checked, paste multiple layers as they are.
When [OS Standard Clipboard] is checked, flatten multiple layers and paste.
Open
Open MDP, PNG, JPEG, BMP, GIF, PSD format file.
Open Recent File
Open a file from the recent history. History will hold the recent 8 files at max.
Open Recent Folder
Open a folder from the recent history. History will hold the recent 8 files at max.
Open As a New Layer
Open as a new layer on the canvas.
Open the Auto Backup Folder
Open the auto backup MDP file.
Save
Overwrite the active file as the same format and file name. Use [Save As] when you want to change a file format or preserve the original file.
Layer data cannot be kept in BMP, JPEG, and PNG formats. To keep layer data, a file needs to be saved in MDP or PSD format. Transparency setting in PNG format and saving quality setting in JPEG format will be specified in the [Save Setting] dialog after naming the file.
Save As
Enter the file name and click [Save] to save the file.
Supported file formats are MDP, PNG (24-bit PNG / Transparent PNG), JPEG, BMP and PSD.
Layer data cannot be kept in BMP, JPEG, and PNG formats. To keep layer data, a file needs to be saved in MDP or PSD format.
Moreover, [Save As] BMP, JPEG, or BMP format while editing MDP or PSD format will change the file format. Therefore, using [Export] or [Rasterize] is recommended when changing the file saving format.
Transparency setting in PNG format and saving quality setting in JPEG format will be specified in the [Save Setting] dialog after naming the file.
Export As (Specify Date)
Create a new file and save with created date, separately from the file being edited.
Supported file formats are MDP, PNG (24-bit PNG / Transparent PNG), JPEG, BMP and PSD.
Export
Export the flattened active canvas in file formats except MDP.
Supported file formats are MDP, PNG (24-bit PNG / Transparent PNG), JPEG, BMP and PSD.
[Export Settings] dialog box
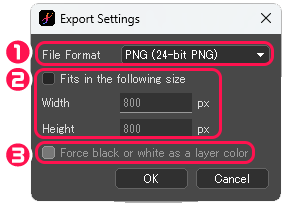
①File Format : Choose the export format from PNG ( 24-bit PNG / Transparent PNG), JPEG, or BMP.
②Fits in the following size : Check the box and specify the [Width] and [Height] values to export the file within the specified size.
③Force black or white as a layer color : Exporting 8-bit or 1-bit layer with layer color other than black or white while checking the box makes layer color to be black when brightness setting is set 50 to 100 or to be white when brightness setting is set 0 to 49.
Export (CMYK format PSD)
When [CMYK Soft Proof] is turned on, a file is exported as PSD format in CMYK mode.
Export (ICO)
When the canvas size is smaller than 256 pixel × 256 pixel, a file is exported as ICO format.
Export (Base64/PNG)
Export the active canvas as TXT file converted with Base64 format.
Export Animation (Animated GIF)
Export as animated GIF file when multiple layers are included in the active canvas.
[Animated GIF Settings] dialog box
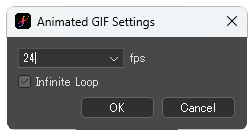
Specify frame rate (fps) from the pull-down menu.
Generate a file replaying infinitely by checking [Infinite Loop].
Export Animation (APNG)
Export as animation (APNG) file when multiple layers are included in the active canvas.
[APNG Settings] dialog box
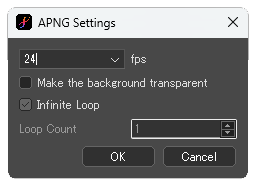
Specify frame rate (fps) and background transparency.
Generate a file replaying infinitely by checking [Infinite Loop].
When [Infinite Loop] is unchecked, you can specify the number of loop between 1 to 100.
Time-lapse
- Start Recording : Specify the file name and record the drawing process as APNG file from the recording start point.
- End Recording : Stop the recording. You can convert APNG file to animated GIF file in the dialog box appears at stop recording.
[Animated GIF Conversion] dialog box
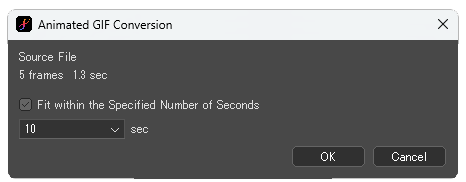
By checking [Fit within the Specified Number of Seconds], you can fit the animation within the selected length from the pull-down menu.
Rasterize
Rasterize the active canvas. Once the canvas is rasterized, a new canvas with flattened layers is generated.
[Rasterize Option] dialog box
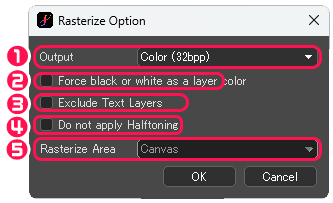
①Output : Choose [Color (32bpp)], [Grayscale (8bpp)], [Monochrome (1bpp)].
②Force black or white as a layer color : Rasterizing [Grayscale (8bpp)] or [Monochrome 2 tones (1bpp)] while checking the box makes layer color to be black when brightness setting is set 50 to 100 or to be white when brightness setting is set 0 to 49.
③Exclude Text Layers : Check this box to rasterize all layers except text layer.
④Do not apply Halftoning : Check this box to rasterize layers with halftone in greyscale.
⑤Rasterize Area : For cartoon/manga manuscripts, you can specify the area from [Canvas], [Extended to Tombo], [Outer Frame] or [Inner Frame].
Export Layers
When multiple layers or layer folder are included in the active canvas, PNG files of each layer will be exported sequentially into the designated folder.
Layer folder will be merged down and exported as one file.
Print the active canvas.
[Print] dialog box
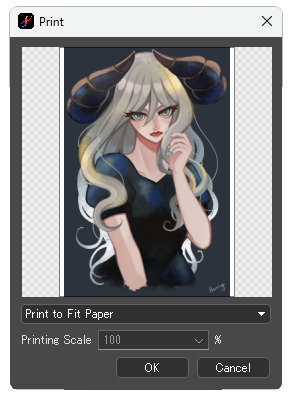
[Print to Fit Paper] adjusts the canvas to fit paper size automatically.
[Use Image Resolution] lets you specify [Printing Scale].
When a printer is not connected, you can export as PDF. The default paper size is set as A4 vertical orientation.
Environment Settings
[Environment Settings] dialog box
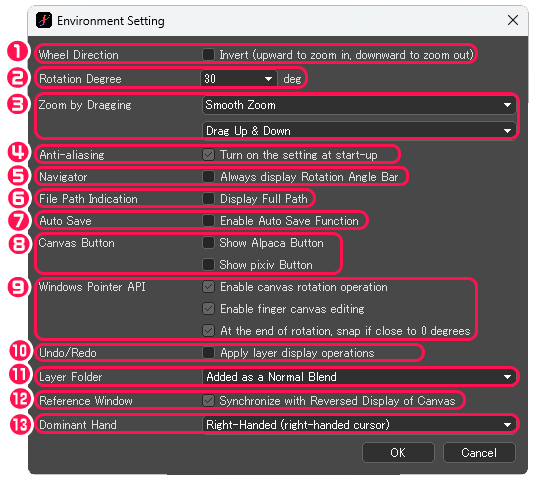
①Wheel Direction : Specify the directions of mouse wheel rotation and zooming in and out of canvas.
②Rotation Degree : Specify the canvas rotation angle.
③Zoom by Dragging : Set up the zooming in/out of the canvas display with shortcut [Space + Ctrl / Command + dragging].
④Anti-aliasing : Turn on/off anti-aliasing at startup.
⑤Navigator : Rotation angle bar is always displayed in [Navigator] window by checking [Always display Rotation Angle Bar].
⑥File Path Indication : The full path of file name is displayed at the top of the canvas by checking [Display Full Path].
⑦Auto Save : Turn on/off the auto save function.
⑧Canvas Button : Turn on/off the display of Alpaca and pixiv buttons at the upper-right of the canvas.
⑨Windows Pointer API : Set up the touchscreen setting when [Pen Pressure API] is set to [Touch PC + Pen Tablet (Wintab)]. ※Windows Only
- Enable canvas rotation operation : By checking the box, you can rotate, zoom in and out the canvas with fingers.
- Enable finger canvas editing : By checking the box, you can draw on the canvas with one finger.
- At the end of rotation, snap if close to 0 degrees : By checking the box, canvas rotation snaps to 0 degree when the value is close to 0 degree (original position) at the end.
⑩Undo/Redo : Specify whether to include the layer display operation while applying [Undo] or [Redo] or not.
⑪Layer Folder : Set the default blending of layer folder as [Pass Through] or [Normal].
⑫Reference Window : Choose whether the canvas invert and [Reference] window invert are synchronized or not.
⑬Dominant Hand : You can change the cursor orientation to match your dominant hand.
Brush Environment Settings
[Brush Environment Settings] dialog box
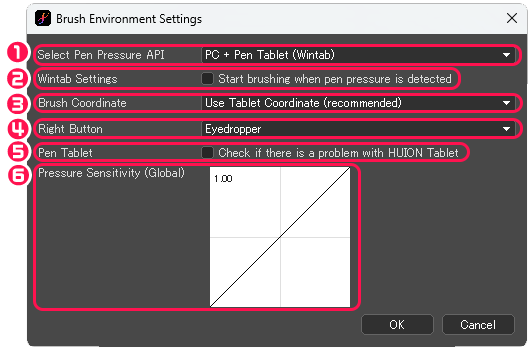
①Select Pen Pressure API ※Windows Only
- Touch PC + Pen Tablet (Wintab) : Select this option when the pen tablet is connected to a PC with touch function.
- PC + Pen Tablet (Wintab) : Select this option when the pen tablet is connected to a PC without touch function.
- Tablet PC : Select this option when you draw directly on a pen tablet, such as LCD tablet.
②Wintab Settings : By checking the box, brush drawing starts when the pen pressure is detected. If the device does not work properly with the pen pressure detection, try checking this option. ※Windows Only
③Brush Coordinate : When [Use Tablet Coordinate (recommended)] is selected, moving the mouse while drawing on a tablet will not affect on drawing. When [Use Mouse Coordinate] is selected, moving the mouse will affect on drawing.
④Right Button : You can assign [Eraser] or [Eyedropper] tool to the right button of the mouse.
⑤Pen Tablet : Check this box if there is any problem with the HUION tablet.
⑥Pressure Sensitivity (Global) : The pressure sensitivity can be adjusted by moving the graph. Smaller than 1.00 value makes softer, and larger than 1.00 value makes harder.
Select Pen Pressure API ※Windows Only
[Select Pen Pressure API] dialog box
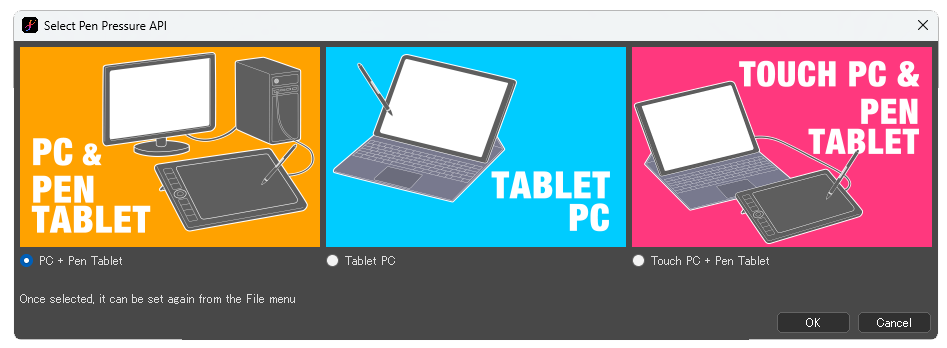
- PC + Pen Tablet : Select this option when the pen tablet is connected to a PC without touch function.
- Tablet PC : Select this option when you draw directly on a pen tablet, such as LCD tablet.
- Touch PC + Pen Tablet : Select this option when the pen tablet is connected to a PC with touch function.
Shortcut Settings
[Shortcut Settings] dialog box
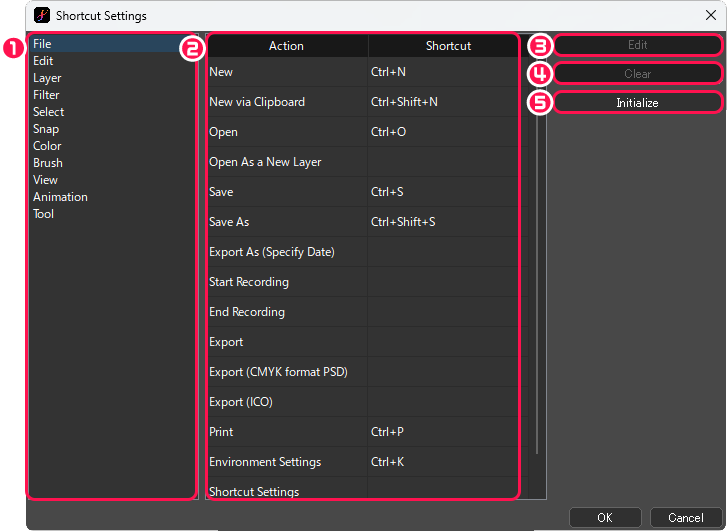
①The list of categories for shortcut keys is shown.
②Action/Shortcut : The lists of set actions and assigned shortcut keys are shown.
③Edit : You can assign a new shortcut key by clicking after selecting an action.
④Clear : You can remove an assigned shortcut key by clicking after selecting an action.
⑤Initialize : Initialize all shortcut key settings.
Close
Close an active canvas. When changes are applied to the canvas, the confirmation dialog box will pop up.


