[File] menu is home to commands that let you perform any filter-related operation.
- Levels
- Brightness/Contrast
- Hue
- Tone Curve
- Posterization
- Gradient Map
- Negative-Positive Inversion
- Monochrome (Brightness)
- Monochrome (RGB Average)
- Channel Operation
- Chromatic Aberration
- Unsharp Mask
- Gaussian Blur
- Motion Blur
- Lens Blur
- Mosaic
- Extracting Lines
- Cloud
- Sand
- Japanese Pattern
- Noise
- Line (Concentrated)
- Line (Parallel)
- Line (Sea Urchin Flash)
Levels
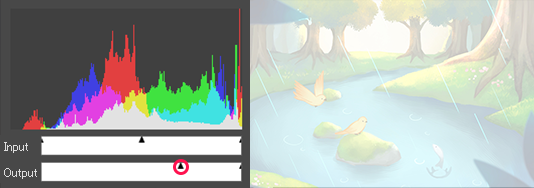
Adjust the brightness of the image with [Input] and [Output] bars.
[Levels] dialog box

①Histogram
This graph shows the quantity of pixels in the image for each RGB value. The horizontal axis is the value (level : 0-255) and the vertical axis is the quantity of pixels.
②Input
You can set shadow, midtone, and highlight levels.
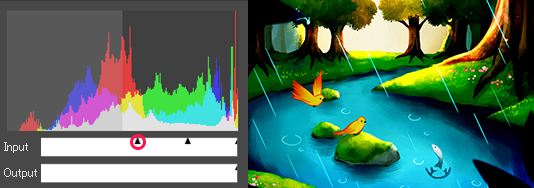
The left slider refers to the shadow level settings. The default value is 0 (black), so moving it to the right will darken the image.
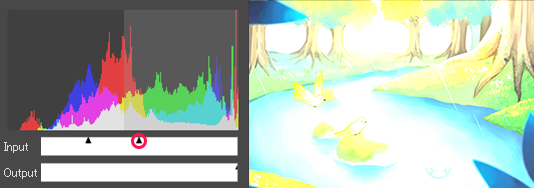
The slider on the right refers to the highlight level settings. The default value is 255 (white), so moving it to the left will brighten the image.
The center slider moves in connection with the left or right slider when they are moved. You can freely move it within the range between the left and right sliders to set the midtone level. Moving it to the left darken the image, and to the right brighten it.
③Output
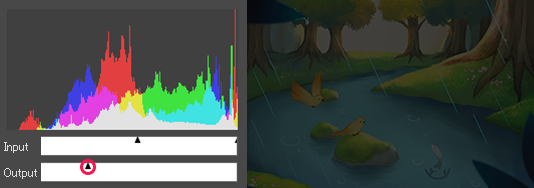
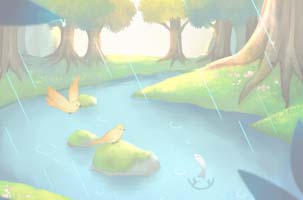
Adjust the upper and lower limits of the level of the image. The histogram of the image will be output as RGB values in the range between the left and right sliders. Moving the right slider to the left darkens the image because the level is limited to a range close to 0, and moving the left slider to the right brightens the image because the level is limited to a range close to 255.
Original

Move the left slider of [Input] to the right
Move the right slider of [Input] to the left
Move the right slider of [Output] to the left
Move the left slider of [Output] to the right
Brightness/Contrast
Adjust the brightness and contrast of the image.
[Brightness/Contrast] dialog box

[Brightness]:Specify the brightness value. Positive values make the image brighter, while negative values make the image darker.
[Contrast]:Specify the contrast value. Positive values increase the image contrast, while negative values decrease the image contrast and bring it closer to gray.
When [Preview] is checked, the image applied the filter will be shown.
Original

Brightness : -100

Brightness : +100

Contrast : -50

Contrast : +100

Hue
Adjust the hue, saturation, and brightness.
[Hue Saturation Brightness] dialog box

Hue:Specify the hue values of the colors in the image. Positive values moves the hue ring to the right, while negative values moves it to the left. Setting the value to 180 will reverse the hue.
Saturation:Specify the saturation value. As the value approaches 100, the image becomes more vivid. Setting value to -100 will remove the saturation, resulting in a grayscale image.
Brightness:Specify the brightness value. Positive values make the image closer to white, while negative values make it closer to black.
Original

Hue : -100

Hue : +100

Saturation : -100

Saturation : +100

Brightness : -50

Brightness : +50
Tone Curve
Adjust the brightness, color tone, and contrast of an image by moving the curve.
[Tone Curve] dialog box

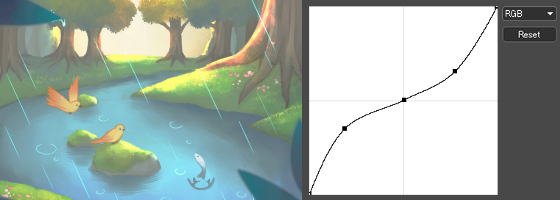
①Moving the curve up makes the image brighter, while moving down makes darker. The upper right of the graph corresponds to the brighter areas of the image, and the lower left corresponds to the darker areas.
②Choose the channel from RGB, R, G, and B.
③Reset: Initialize curves of all channels.
Original

Curve S
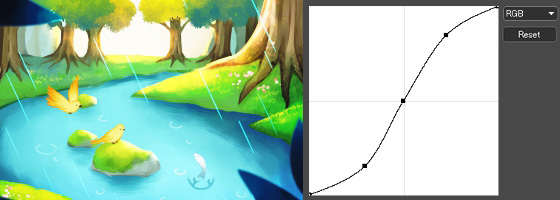
Reverse Curve S
Posterization
limit the number of tones in an image and reduce the number of colors.
[Posterization] dialog box

Steps:Specify the number of posterization steps. The smaller the [Steps] is, the stronger the effect is. The default value is 4.
Original

After execution ( Steps: 7 )

Gradient Map
Replace colors in the image with colors of a gradient, which depends on the lightness or darkness of each color.
[Gradient Map] dialog box
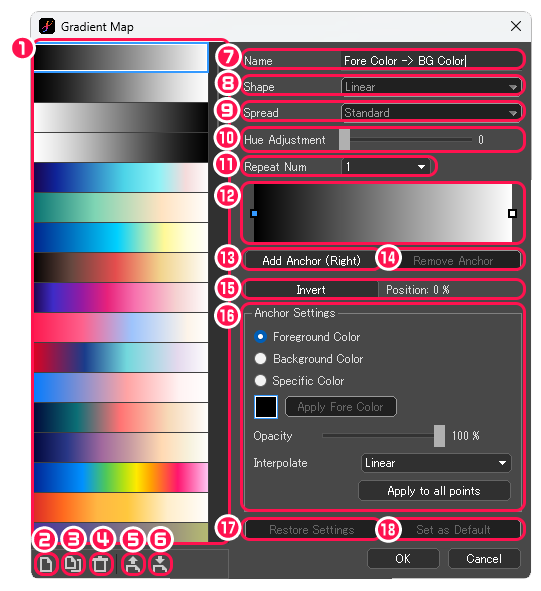
①The list of gradients is shown.
②Add a Gradient : Add new gradient.
③Duplicating a Gradient : Duplicate the selected gradient.
④Remove Gradient : Remove the selected gradient.
⑤Export Gradient to a File : Export the selected gradient as an MDG file.
⑥Import Gradient from a File : Import the MDG file and adds a gradient.
⑦Name : Edit the name of a gradient.
⑧Shape : Can’t adjust in the gradient map.
⑨Spread : Can’t adjust in the gradient map.
⑩Hue Adjustment : Change the hue of the selected gradient.
⑪Repeat Num : Specify the number of times to repeat the selected gradient.
⑫The color information of the selected gradient is shown.
⑬Add Anchor (Right) : Add a control anchor to ⑫.
⑭Remove Anchor : Remove a selected control anchor on ⑫.
⑮Invert : Reverse the selected gradient.
⑯Anchor Settings
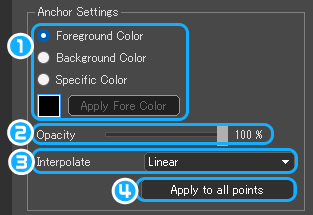
❶Specify the color of the anchor.
❷Opacity : Specify the opacity of the anchor.
❸Interpolate : Specify how to interpolate gradient colors.
❹Apply to all points : The color interpolation method of the selected anchor is applied to all anchors.
⑰Restore Settings : Discard edits.
⑱Set as Default : The edited content will be synchronized as the initial setting of the selected gradient.
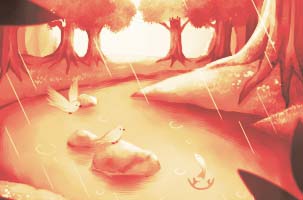
Original

Gradient : [Fireplace]
Negative-Positive Inversion
Reverse the negatives and positives of an image.
Original

After execution

Monochrome (Brightness)
Convert the image to monochrome based on luminosity.
Monochrome (RGB Average)
Convert the image to monochrome based on the average of the RGB values.
Original

Monochrome (Brightness)

Monochrome (RGB Average)

Channel Operation
Adjust the color balance of the image based on the channel.
[Channel Operation] dialog box

①[A]・[R]・[G]・[B] : Apply the value to each channel of the image.
②Reset : Reset all parameters to their initial values.
③Preset : Specify value of those below; [R Component]・[G Component]・[B Component]・[Line Extraction]・[Monochromatization]
Original

A=A, R=R, G=G, B=255-A

Preset [R Component]

Chromatic Aberration
Shift the RGB of the image.
[Chromatic Aberration] dialog box

Adjust the movement in the vertical direction on the X bar (the default value is 5), and in the horizontal direction on the Y bar.
Original

X : +5, Y : +5

Unsharp Mask
Increase the contrast of pixels in the image and apply a sharpening effect.
[Unsharp Mask] dialog box

Radius : Specify the width of the contrast boundary.
Amount : Specify the strength of contrast.
When [Preview] is checked, the image applied the filter is shown.
Original

Radius : 2.04, Amount : 300%

Gaussian Blur
Apply the Gaussian blur effect to the image.
[Gaussian Blur] dialog box

The larger the [Value] is, the stronger the blur is.
When [Preview] is checked, the image applied the filter is shown.
Original

After execution( Value : 2.04 )

Motion Blur
Apply a blur effect, based on direction and amount of motion, to the image.
[Motion Blur] dialog box

①Specify the direction of blur.
②Intensity : Specify the amount of blur in pixels.
When [Preview] is checked, the image applied the filter is shown.
Original

Direction of movement : horizontal, Intensity : 50

Lens Blur
Apply a lens blur effect to the image. This is useful when you want to emphasize light effects more than Gaussian blur.
[Lens Blur] dialog box

Radius : Specify the blur intensity.
Brightness : Specify the brightness of the color of the bright areas.
When [Preview] is checked, the image applied the filter is shown.
Original

Radius : 2.01, Brightness : 4.00

Mosaic
Apply a mosaic effect to the image.
[Mosaic] dialog box

Size : Specify the mosaic block size in pixels. The default value is 16.
Original

Size : 10

Extracting Lines
Set the contrast of the image in the same way as [Input] in [Levels] and extract the alpha value.
[Extracting Lines] dialog box

Original

After execution

Cloud
Generate a cloud pattern with the current foreground color and background color.
You can use this pattern as a texture by generating with black as foreground color and white as background color, and changing the blending of the layer to [Overlay].
After execution (foreground color : black, background color : white)

Sand
Generate a sand pattern with the current foreground color and background color.
You can use this pattern as a texture by generating with black as foreground color and white as background color, and changing the blending of the layer to [Overlay].
After execution (foreground color : black, background color : white)

Japanese Pattern
Generate a Japanese pattern with the current foreground color and background color.
[Japanese Pattern] dialog box

①Name : Choose the type of Japanese pattern.
②Choose the type of Japanese pattern from thumbnails.
③Size : Specify the size of the pattern.
④Angle : Specify the angle of the pattern.
⑤Density : Specify the density of the pattern. (only for [Polka Dot])
⑥Transparent Background : Generate a pattern with foreground color only.
⑦Color Exchange : Exchange the foreground color and background color.
⑧Random Color : Change a pattern to a random color combination.
List of Japanese patterns
・Sea (Seigaiha)

・Sea (Hishi Seigaiha)

・Sippou

・Sippou 2

・Sanki Kuzushi

・Arrow (Yagasuri)

・Arrow 2 (Yagasuri)

・Scale (Uroko)

・Hound’s Tooth

・Polka Dot

・Suri Bitta

・Turtle (Kikkou)

・Checker Board

・Asanoha

・Tatewaku

・Hundou Tsunagi

・Sayagata
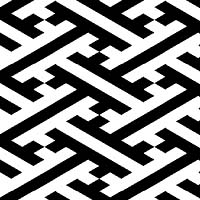
・Vertical Stripes

・Horizontal Stripes

Noise
Apply a noise effect to the image.
[Noise] dialog box

Strength : Specify the noise intensity. The default value is 50.
Type : Choose the type from [Color] or [Monochrome].
Original

Strength : 50, Type : Color

Strength : 50, Type : Monochrome

Line (Concentrated)
Generate concentrated lines.
[Concentrated Lines] dialog box

①Specify Center : Specify the center of concentrated lines.
②Length : Adjust the length of lines.
③Length (Random) : Adjust the length of lines randomly.
④Line Width : Adjust the thickness of lines.
⑤Density : Adjust the space between lines.
⑥Density (Random) : Adjust the density of lines randomly.
⑦Aspect Ratio : Adjust the the overall shape of concentrated lines.
⑧Reset : Reset all parameters to their initial values.
⑨Update Randomness : Renew the random parameters.
Example

Line (Parallel)
Generate streamlines.
[Parallel Lines] dialog box

①Specify Direction : Specify the direction of lines.
②Length : Adjust the length of lines.
③Length (Random) : Adjust the length of lines randomly.
④Line Width : Adjust the thickness of lines.
⑤Density : Adjust the space between lines.
⑥Density (Random) : Adjust the density of lines randomly.
⑦Reset : Reset all parameters to their initial values.
⑧Update Randomness : Renew the random parameters.
Example

Line (Sea Urchin Flash)
Generate sea urchin flush.
[Sea Urchin Flash] dialog box

①Length : Adjust the length of lines.
②Length (Random) : Adjust the length of lines randomly.
③Line Width : Adjust the thickness of lines.
④Density : Adjust the space between lines.
⑤Density (Random) : Adjust the density of lines randomly.
⑥Offset (Random) : Adjust line misalignment.
⑦Fade In/Out Pos : Specify the position of fade in/out of lines.
⑧Reset : Reset all parameters to their initial values.
⑨Update Randomness : Renew the random parameters.
Example


