[Select] menu is home to commands that let you create and edit selection, transform an image, and so on.
All
Specify the entire canvas as selection.
Deselect
Cancel selection.
Inverse
Reverse selected and unselected areas.
Expand
Expand selection.
[Expand] dialog box

Specify the width of expansion in pixels. The default value is 1 pixel.
Check [Round a corner] to round the corners of the expanded selection.
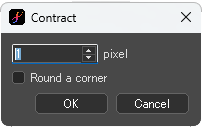
Contract
Contract selection.
[Contract] dialog box

Specify the width of contraction in pixels. The default value is 1 pixel.
Check [Round a corner] to round the corners of the contracted selection.
Create Selection from Layer (Opacity)
Generate selection based on the opacity of the image of the active layer.
Create Selection from Layer (Brightness)
Generate selection based on the brightness of the image on the active layer. Painted with the near-white color areas will be close to transparent, and white areas will not be selected.
Select Foreground Color Range
Generate selection based on the foreground color range of the active layer.
Highlight Outside
Check this to display unselected areas in light blue.
Draw Selection Border
Draw the border of the selection.
[Draw Selection Border] dialog box

①Specify the drawing area from [Inside] / [Outside] / [On Boundary].
②Specify the width of the boundary line.
③[Round a corner, Keep line width] : Check this box to round the corner part and keep the line width uniform.
Transform
Transform the selection. Keep holding down the ctrl key to free transform.
[Transform] bar

①The angle of rotation is shown.
②Flip : Flip the selection left or right.
③Choose the point of expansion/contraction from center or diagonal.
④Perspective : Check this box to apply perspective correction to the transformation.
⑤Specify the completion format of the transformed image from [Nearest neighbor (Jaggies)] / [Bilinear (Smooth)] / [Bicubic (Sharp)].
Mesh Transform
Mesh-transform the selection.
[Mesh Transform] Bar

①Column : Specify the number of vertical divisions from 1 to 12. The default value is 4.
②Row : Specify the number of horizontal divisions from 1 to 12. The initial value is 4
③Specify the completion format of the transformed image from [Nearest neighbor (Jaggies)] / [Bilinear (Smooth)] / [Bicubic (Sharp)].
④Bilateral Symmetry : Check this box to move the mesh symmetrically.
⑤Upper and lower symmetry : Check this box to move the mesh vertically symmetrically.
⑥Lock Translation and Rotation : Check this box to lock the position of the mesh during transformation.


