This section explains the types of snap and how to use them.
You can use snap by choosing an icon on the tool-options-bar when brush tool is selected, by choosing in [Snap] menu, or by pressing a shortcut key.
Here the types of snaps.

①Snap Off : Snap is not chosen.
②Parallel Snap : Draw parallel lines.
③Crisscross Snap : Draw vertical and horizontal lines.
④Vanishing Point Snap : By setting two lines, you can draw lines in perspective extending from the same vanishing point.
⑤Radial Snap : Draw a line extending toward the set point.
⑥Circle Snap : Draw concentric circles.
⑦Curve Snap : Set up a simple Bezier-like curve guide and draw a line along it.
⑧3D Perspective Snap : Draw lines in perspective along with 3D model.
⑨Grid Snap : Draw lines along the grid.
⑩Guide Snap : Draw lines along the guide.
⑪Snap Settings : Reset the active snap.
Parallel Snap

Draw parallel lines.
How to use
①Choose [Parallel Snap] ![]()
②Click [Snap Settings] ![]() to change the snap angle.
to change the snap angle.
③Click any position to fix the snap position.
④Draw a line along the snap.

Crisscross Snap

Draw vertical and horizontal lines.
How to use
①Choose [Crisscross Snap] ![]()
②The guide will appear and you can draw lines along it.

Vanishing Point Snap

By setting two lines, you can draw lines in perspective extending from the same vanishing point.
How to use
①Choose [Vanishing Point Snap] ![]()
②Click [Snap Settings] ![]() to change the snap position.
to change the snap position.
③Click 4 times at any position and set 2 parse lines to decide the snap position.
④Draw a line along the snap.

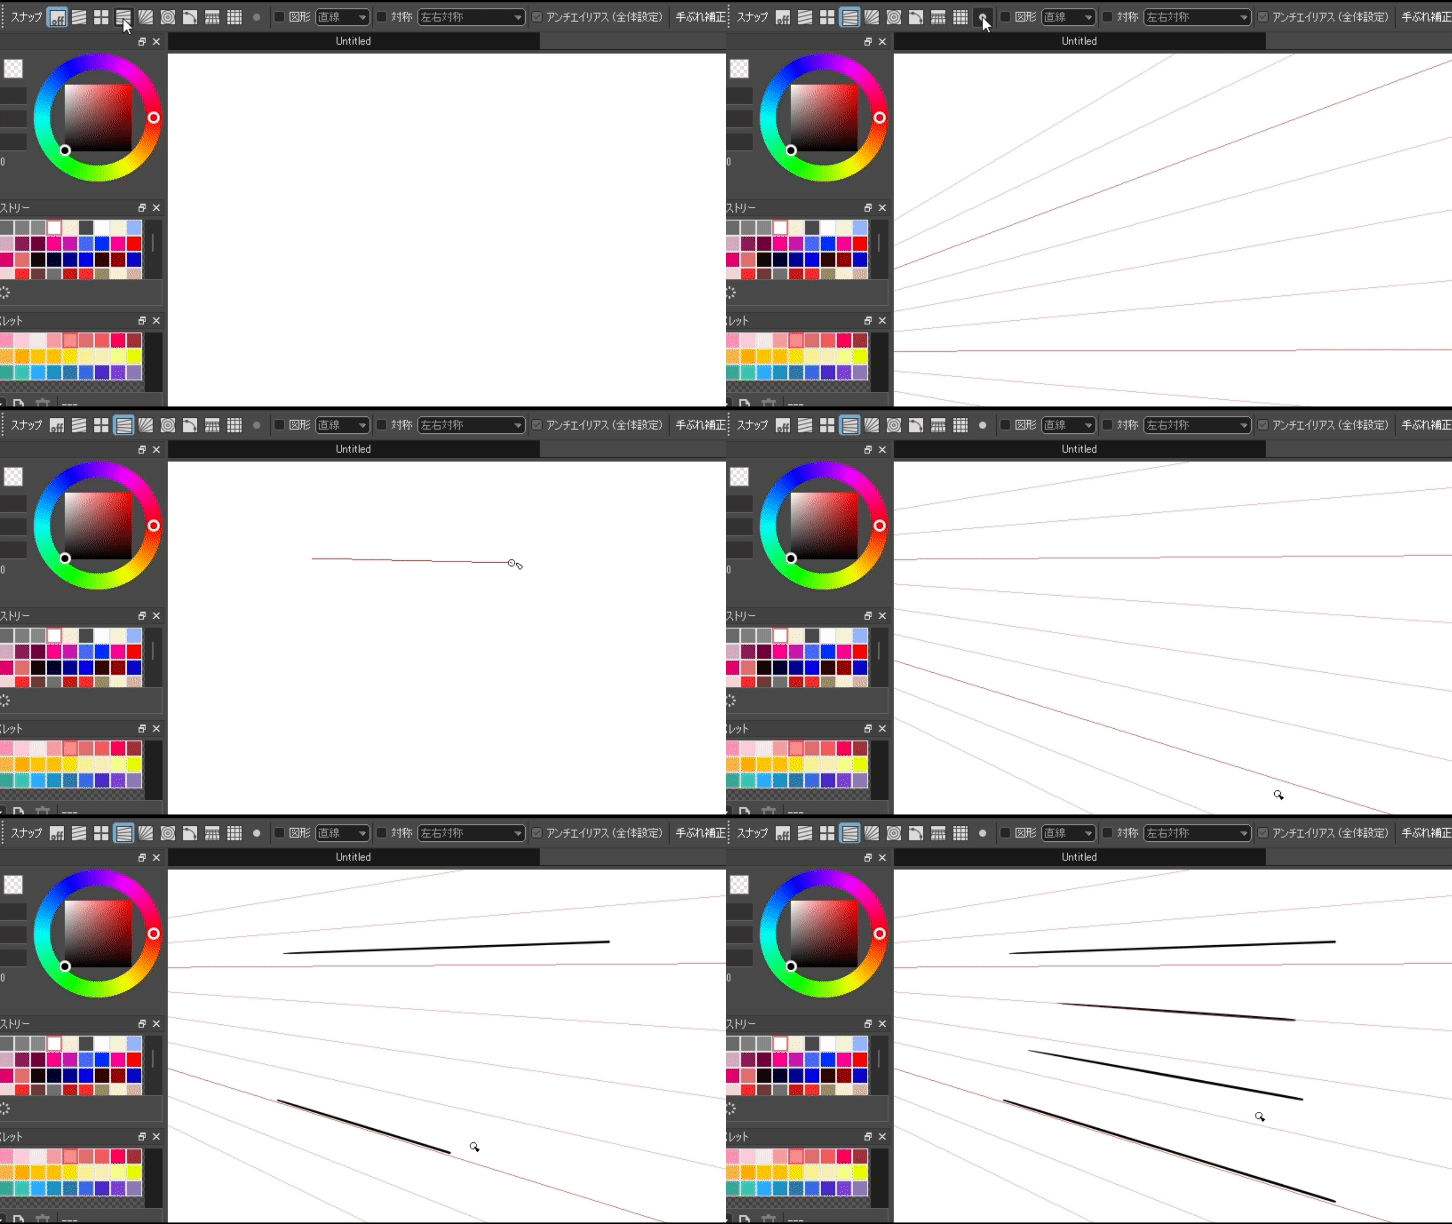
Radial Snap

Draw a line extending toward the set point. It can also be used to draw a perspective line with a vanishing point.
How to use
①Choose [Radial Snap] ![]()
②Click [Snap Settings] ![]() to change the snap position.
to change the snap position.
③Click at any position to decide the snap position.
④Draw a line along the snap.
Circle Snap

Draw concentric circles.
How to use
①Choose [Circle Snap] ![]()
②Click [Snap Settings] ![]() to change the snap position.
to change the snap position.
③Click at any position to decide the snap position.
④Draw a line along the snap.

Curve Snap

Set up a simple Bezier-like curve guide and draw a line along it.
How to use
①Choose [Curve Snap] ![]()
②Click [Snap Settings] ![]() to change the shape of the snap.
to change the shape of the snap.
③Click any position to set the curve point.
④Double-click to set the end point of the curve and confirm the snap shape. The confirmed snap can be moved, rotated, scaled and flipped up and down / left and right.
⑤Draw a line along the snap.

3D Perspective Snap

Draw lines in perspective along with 3D model.
How to use
①Click [Snap] > [Add 3D Perspective] in the menu to add a 3D perspective layer and a three-dimensional object on the canvas. This object can be moved and scaled with the operation tool.
②Add a new layer above the 3D perspective layer.
③Choose [3D Perspective Snap]] ![]() to draw a line along the perspective of the 3D object.
to draw a line along the perspective of the 3D object.
If you cannot draw a line along the 3D model, click [Snap Settings] ![]() , hover cursor to select the object and click to confirm.
, hover cursor to select the object and click to confirm.

How to edit a 3D object
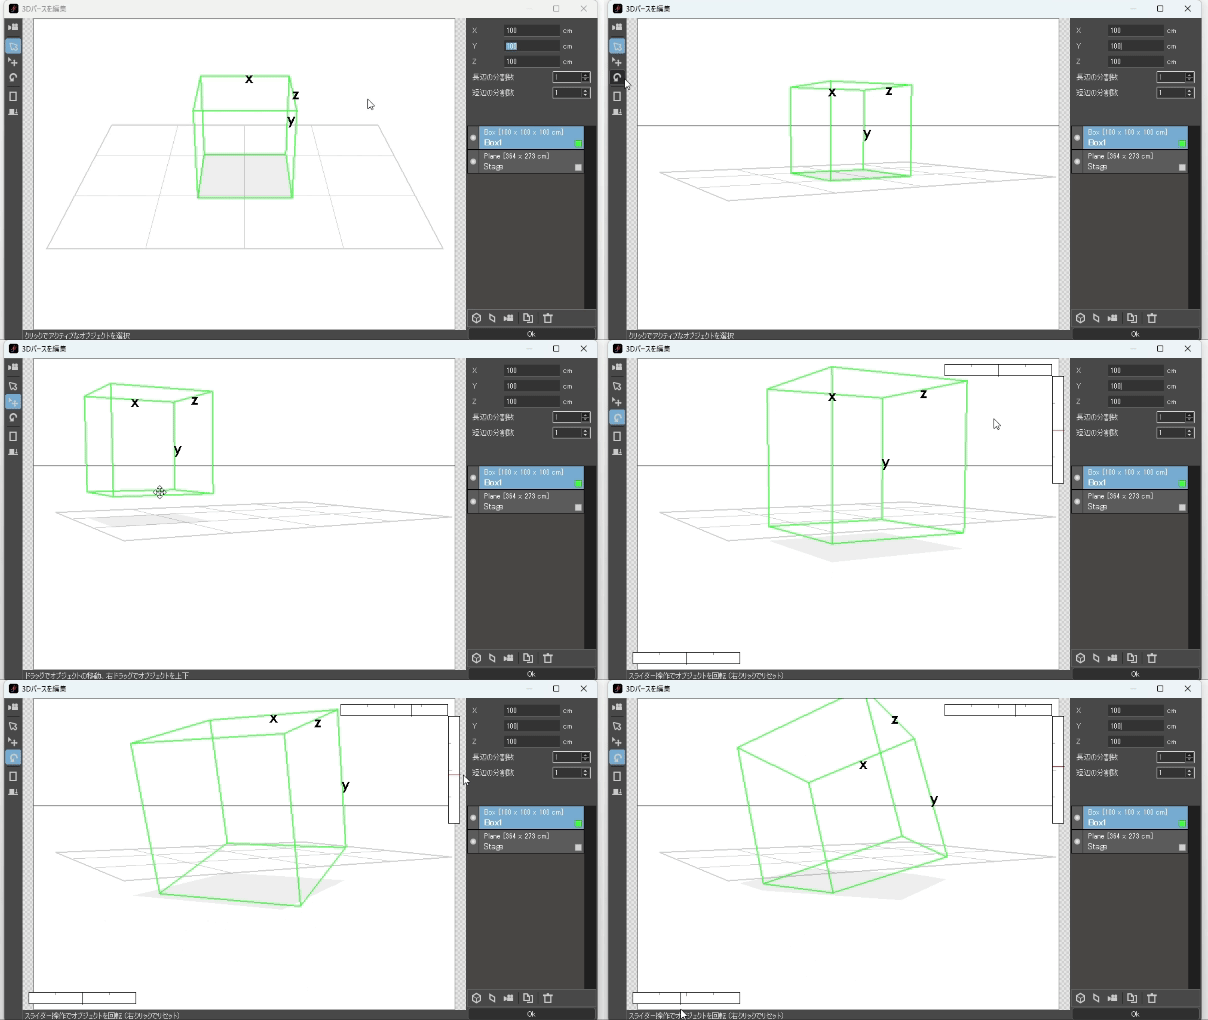
Double-click the 3D perspective layer or click the gear icon to the right of layer name to open [Edit 3D Perspective] dialog box.
[Edit 3D Perspective] dialog box

①Camera Mode : Click to turn on [Camera Mode], then you can change the viewpoint. To turn off [Camera Mode], click again.
②Select Tool : Choose the object to be edited.
③Move Tool : Change the position of the object. Drag to move the box horizontally, or right-click and drag to move it up or down.
④Rotation Tool : Rotate the object in X, Y, or Z direction by moving the slider. The slider can be restored to its initial state by right-clicking it.
⑤Show the Composite Canvas : Composite the image on the canvas.
⑥Ground an Object : Ground the object onto the stage.
⑦Here edit objects. Initially, a stage and a box are placed. The box currently selected has the letters X, Y, and Z, and the board has the letters X and Z.
⑧Specify the size of the object and the number of divisions of grid. When the object is a square or cube, you can only edit [Div Num of Short Side]. If a camera is selected, you can edit the angle of view.
⑨The list of objects is shown. On the list, the object’s name, type, size, color, and angle (for cameras) are displayed. Double-clicking an object name opens [3D Object Property] dialog box where you can edit the name of the object.

⑩Turn on/off object display.
⑪Add Box : Add a box object.
⑫Add Plane : Add a plane object.
⑬Add Camera : Add the current viewpoint as a camera. When you select a camera after changing the viewpoint, camera’s viewpoint is set.
⑭Duplicate : Duplicate an object or camera.
⑮Delete : Delete an object or camera.
Example of editing an object

Grid Snap

Draw lines along the grid.
How to use
①Choose [Grid Snap] ![]()
②A grid will be displayed, then draw a line along it.
To change grid settings, click [View] > [Grid Settings] in the menu.

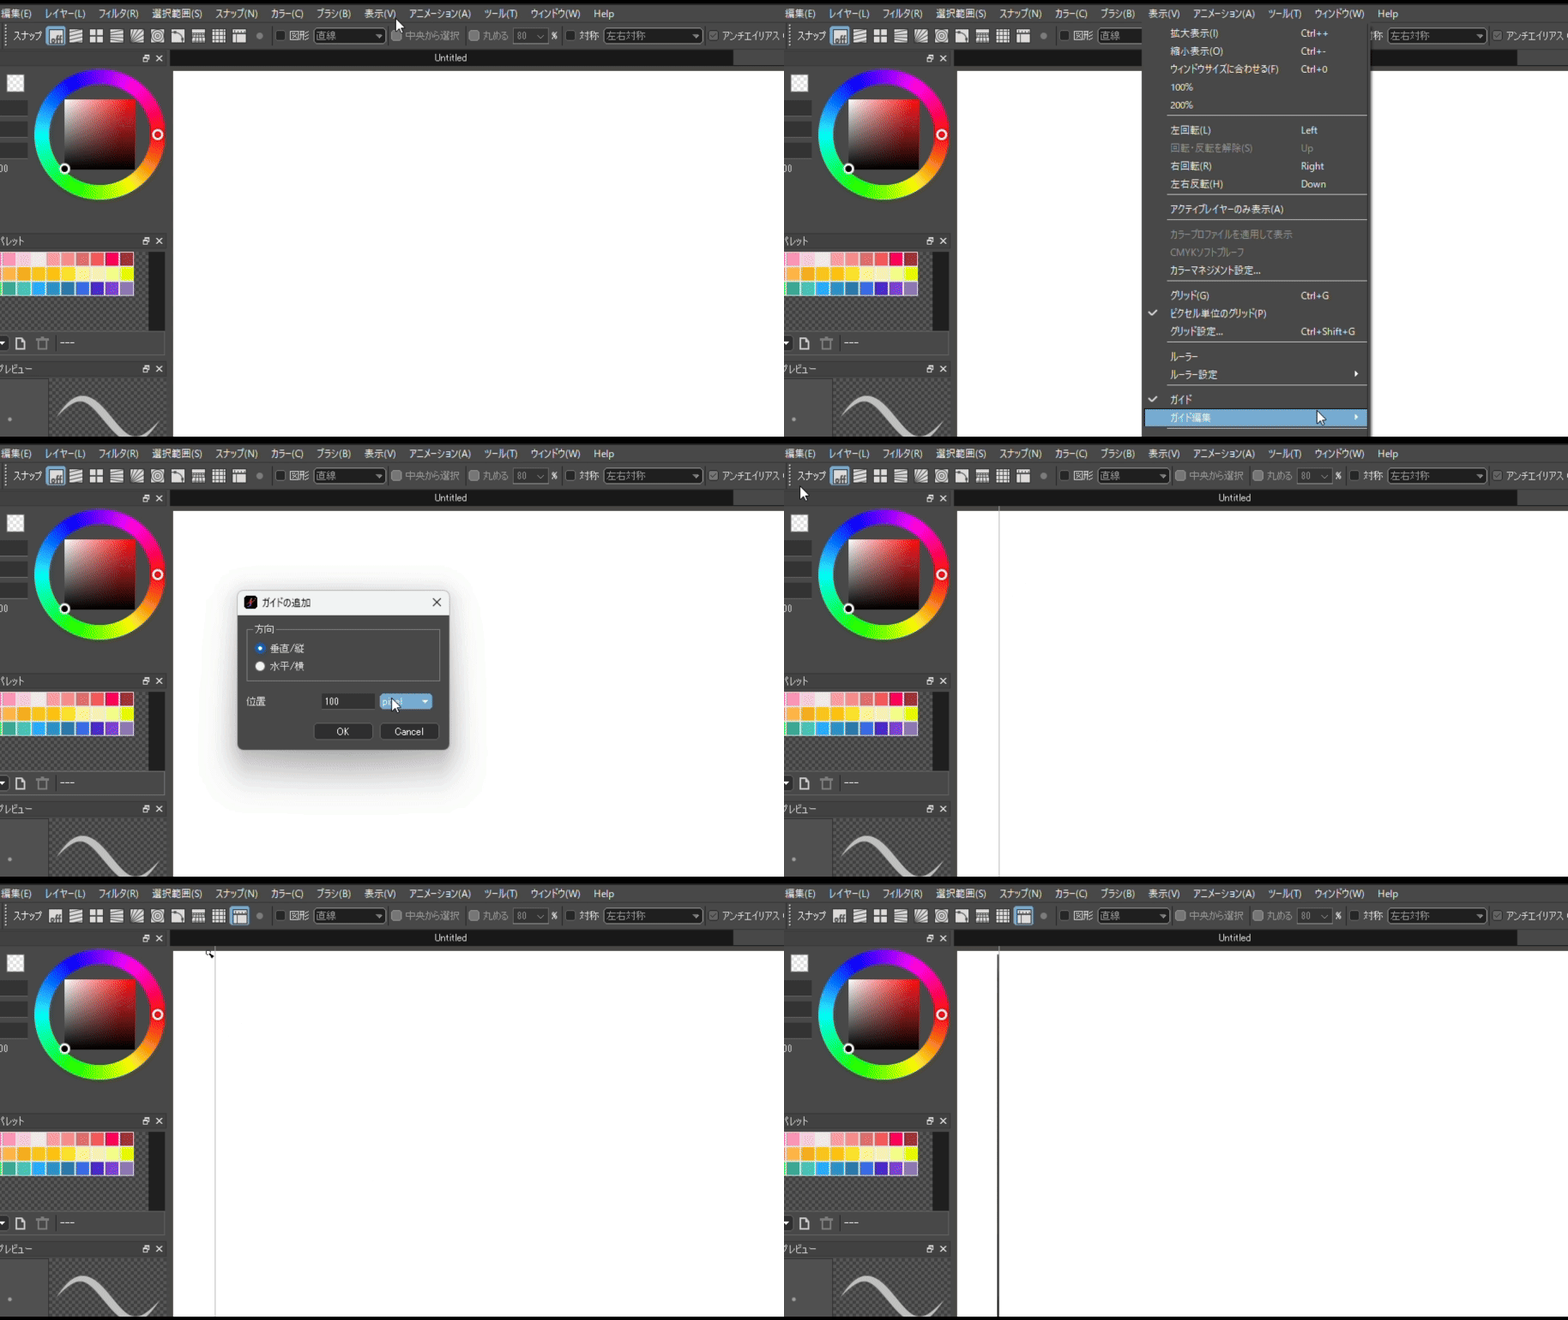
Guide Snap

Draw lines along the guide.
How to use
①Set guide from [View] > [Edit Guides] in the menu.
②Choose [Guide Snap] ![]() and draw a line along the snap.
and draw a line along the snap.

Use Multiple Snap Settings (Save Snap Function)
When multiple snap settings are needed, such as when drawing a two-point or three-point perspective landscape, [Save Snap] function is useful. Since these settings are saved in the MDP file, you can use the same settings for the next process.
①Set [Vanishing Point Snap] or [Radial Snap] corresponding to the first vanishing point. If you know the location of the vanishing point, use [Radial Snap]. If you don’t know it, use [Vanishing Point Snap].
②Click [Snap] > [Save Snap] in the menu and name the active snap setting to save. For example, we named it “1.”

Click [OK] to save the setting. You can see it in the [Snap] menu.

③Click [Snap Settings] ![]() and set another snap for the second vanishing point in the same way as ① and ②. In the case of three-point perspective, repeat steps more again.
and set another snap for the second vanishing point in the same way as ① and ②. In the case of three-point perspective, repeat steps more again.
④By referring from [Snap] menu, you can draw without setting snap each time.
10 settings can be saved; when you save more, the oldest setting is deleted (the order of them is updated as they are used). Once snap setting is saved, it cannot be individually selected for re-editing or delete.


