This section explains how to use tools.
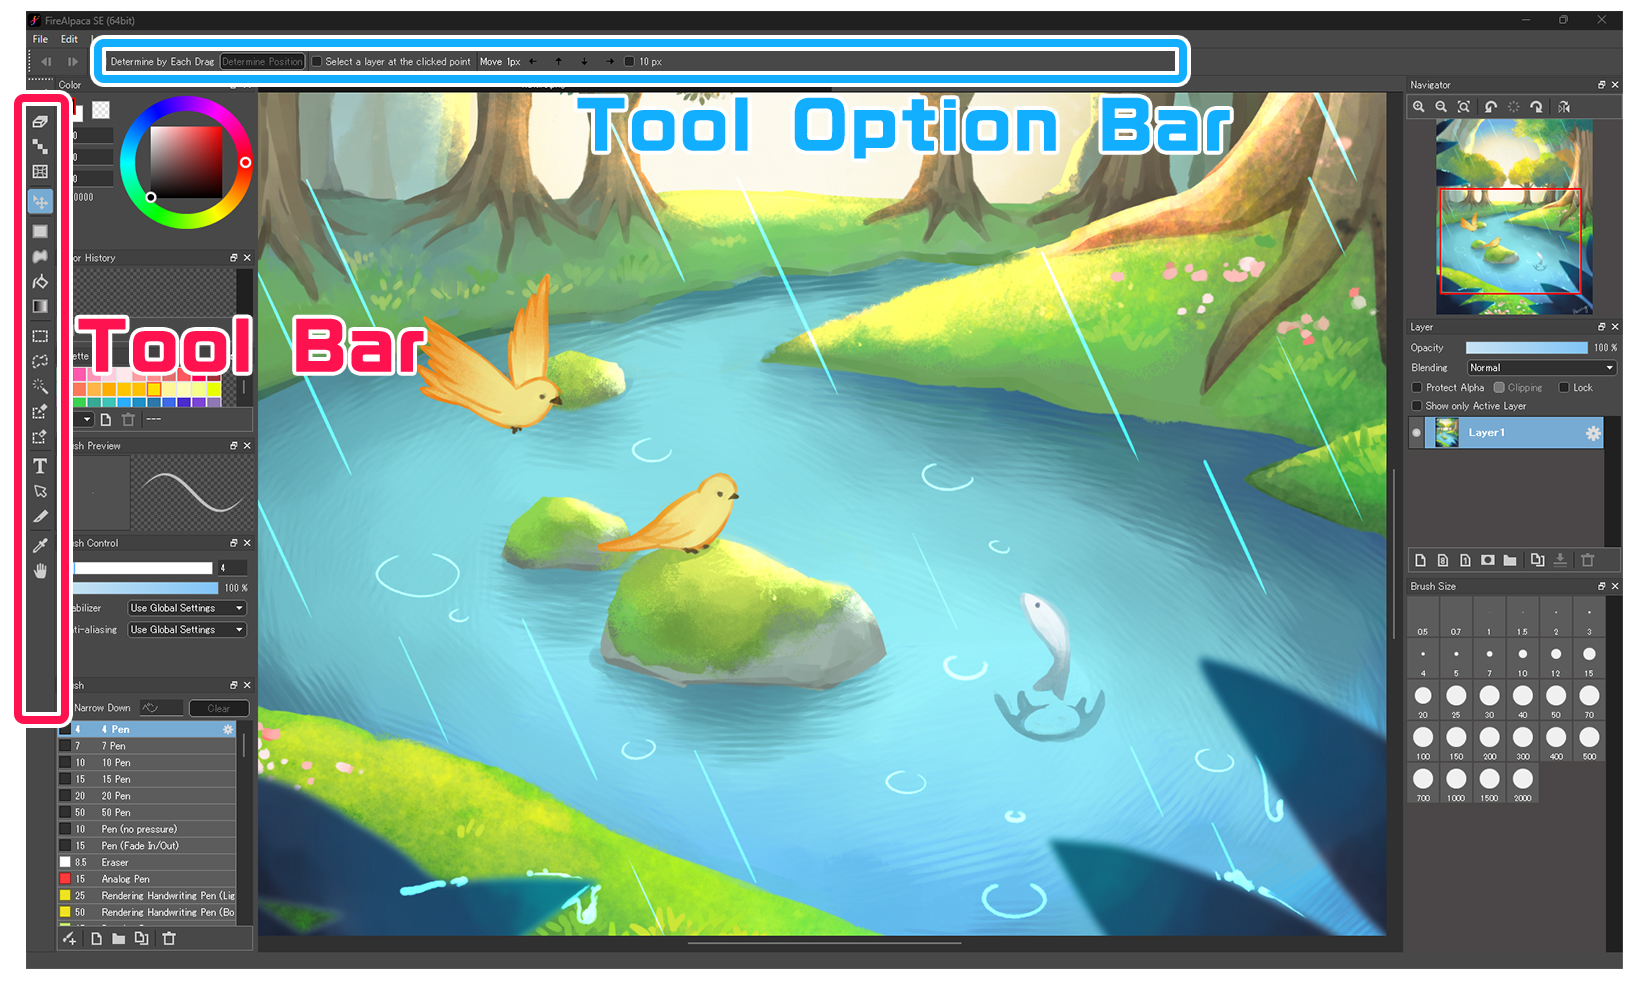
Brush Tool
This is the function to draw lines or paint with brush. Hold the shift key down to draw straight lines.
Besides line drawing, you can draw shapes, snapped and symmetrical lines.
Tool Options bar

①Snap : Choose the type of snap to be used for drawing. Choose [OFF] to stop using it. For more information about how to use snap, please refer to this page.
②Shape : To draw a shape, check the box and choose the type of shape from the pull-down menu. You can choose the type of shape from [Line], [Polyline], [Polygon], [Rectangle], [Square], [Ellipse], [Circle], and [Curve].
③Symmetry : To draw a symmetrical shape, check the box and select the type of symmetry from the pull-down menu. For more information, please refer to this page.
④Anti-aliasing(Global) : By checking the box, anti-aliasing will be applied to all brushes. If you want to set it for the brush individually, set [Anti-aliasing] in [Brush Control] Window.
⑤Stabilizer(Global) : By checking the box, stabilization will be applied to all brushes. If you want to set it for the brush individually, set [Stabilizer] in [Brush Control] Window.
⑥Zero Pressure on Both Ends : By checking the box, pen-pressure will not be applied to the beginning and end of the drawing. When you draw with a mouse or other device that does not work with pen-pressure, it is possible to create an effect like fade in/out of lines.
Change the brush color
You can change the color from [Color] window. The red frame refers to the current color. The foreground color can be changed through the color circle/bar on [Color] window, choosing from [Color Palette] or [Color History] window, or pick up from the canvas with eyedropper tool. When you choose the transparent color, brush strokes can also be used like an eraser.
Change the brush width
Please refer to the following instructions.
①Ajust the bar in [Brush Control] window.
②Choose in [Brush Size] window.
③Click [Brush] > [Previous Brush] or [Next Brush] in the menu.
④Drag left to right holding Ctrl and Alt keys down simultaneously.
Use other brushes
You can change brushes by choosing from the list of [Brush] window.
To add a new brush to the list, click [Show Brush Store (Get a brush)] icon at the lower-left of [Brush] window or click [Brush] > [Add a Brush from the Brush Store] in the menu to open the brush store, where you can download the brush for free.
Customize brushes
Click the gear icon to the right of the brush name to open [Edit Brush] dialog box. You can customize a brush by changing various parameters.
Set pen-prussure
[Pressure Sensitivity] can be set from the menu [File] > [Brush Environment Settings]. If you want to have the fade in/out effect
while drawing the device that does not support pen-pressure (such as a mouse), check the [Zero Pressure on Both Ends] in the tool-bar.
Eraser Tool
This is the function to erase the image on the canvas. Hold the shift key down to erase straight.
Like brush tool, you can customize, use [Snap] / [Shape] / [Symmetry], and set [Anti-aliasing] / [Stabilizer]. The content of tool-options-bar is same as that of brush tool.
Erase through layers
By checking [All Layers] in [Brush Control] window, you can erase through all layers.
Dot Tool
This is the function to draw lines between 1 to 3px thickness.
Which brush is chosen or the pen-pressure doesn’t affect the stroke. Like brush tool, you can change the color, and use as an eraser by choosing the transparent color. Hold the shift key down to draw straight lines.
Tool Options bar

①Shape : To draw a shape, check the box and choose the type of shape from the pull-down menu. You can choose the type of shape from [Line], [Polyline], [Polygon], [Rectangle], [Square], [Ellipse], [Circle], and [Curve].
②Change the width and the opacity.
③Anti-aliasing : By checking the box, anti-aliasing will be applied to the thickness.
Liquify Tool [ FireAlpaca SE Only ]
This is the function to transform part of an image.
This is a FireAlpaca SE-only function.
Tool Options bar

①Choose the type from [Expansion], [Contraction], [Push], [Rotate Right], and [Rotate Left].
②Strength : Adjust the distortion.
③Fixed per Stroke : By checking the box, distortion will be applied to each stroke. When the box is not checked, only the distortion buffer is changed until [Fix] is pressed. In order to blur colors while distorting, check the box; to keep the sharpness of the original image, uncheck the box.
Move Tool
This is the function to move layers, layer folders, and selections. Hold the shift key down to move horizontally or vertically.
Tool Options bar

①Determine by Each Drag : By checking the box, the moving process will be recorded and confirmed by each drag. In this case, [Undo] and [Redo] will be applied to the position of each drag. When the box is not checked, the moving process will not be confirmed until [Determine Position] button is pressed, so the [Undo] and [Redo] will be applied to the position at the time the [Determine Position] button is pressed.
②Select a layer at the clicked point : By checking the box, the layer with the image at the click position is automatically selected. If there are several layers with images at the same position, the top layer is chosen.
③Move 1px : Move in 1px.
Fill Tool
This is the function to fill in the shape of a figure. Like brush tool, you can change the color, and use as a shape eraser by choosing the transparent color.
Tool Options bar

①Specify the type of shape from the pull-down menu. You can choose the type of shape from [Line], [Polyline], [Polygon], [Rectangle], [Square], [Ellipse], [Circle], and [Curve].
②Snap to grid : By checking the box, you can paint a shape along the grid.
③Symmetry : To paint a symmetrical shape, check the box and select the type of symmetry from the pull-down menu. For more information, please refer to this page.
④Anti-aliasing : By checking the box, anti-aliasing is applied to the shape.
⑤RoundCorner : Round the corners of the shape when [Rectangle] or [Polygon] is chosen. You can specify the degree of rounding from the pull-down menu.
⑥Select From Center : By checking the box when [Rectangle] or [Ellipse] is chosen, a shape is drawn from the center. When the box is not checked, a shape is drawn from the diagonal.
⑦Constrain Proportions : By checking the box when [Rectangle] or [Ellipse] is chosen, the aspect ratio is fixed at 1:1.
⑧Opacity : Change the opacity of a shape.
Lasso Fill Tool
This is the function to fill the dragged area. Like brush tool, you can change the color, and use as a lasso eraser by choosing the transparent color.
Tool Options bar

①Closed Area : By checking the box, fill the closed area within the dragged area.
②When [Closed Area] is checked, specify the area to be filled from [Transparent/White] / [Transparent] / [White] / [All]. When [All] is chosen, the area surrounding the closed area is also included in the fill.
③Reference : When [Closed Area] is checked, specify the reference for the fill area from [Canvas], [Active Layer] and [Specified Layer].
④Tolerance : When [Closed Area] is checked, specify the tolerance value of the fill area.
⑤Anti-aliasing : By checking the box, anti-aliasing is applied to the fill.
⑥Expand : When [Closed Area] is checked, specify the expansion or contraction of the fill area.
⑦Opacity : Specify the opacity of the fill.
⑧Do not fill narrow areas : By checking the box when [Closed Area] is checked, narrow areas will not be filled.
⑨Close the gap : By checking the box when [Closed Area] is checked, the gap in the enclosed area will be closed and filled.
Bucket Tool
This is the function to paint a certain area at a time. Like brush tool, you can change the color, and use as a bucket eraser by choosing the transparent color.
Tool Options bar

①Reference : Specify the reference for the fill area from [Canvas], [Active Layer] and [Specified Layer].
②Tolerance : Specify the tolerance value of the fill area.
③Bucket Erase : By checking the box, it can be used as a bucket eraser.
④Anti-aliasing : By checking the box, anti-aliasing is applied to the fill.
⑤Expand : Specify the expansion or contraction of the fill area.
⑥Close the gap : By checking the box, the gap in the enclosed area will be closed and filled.
Gradient Tool
This is the function to paint a gradient. Hold the shift key down to paint horizontally or vertically.
Tool Options bar

①Type : Specify the gradient type from [Foreground-Background] / [Foreground] / [Transparent-Foreground] / [Custom]. Once [Custom] is chosen, [Gradient Edit] dialog box opens.
②Shape : When [Type] is other than [Custom], you can choose the shape of gradient from [Linear] or [Radial].
③Spread : When [Type] is other than [Custom], you can choose the spread of gradient from [Standard] / [Repeat], or [Reflect].
④Preview of the gradient is shown. Click the gear icon to open [Gradient Edit] dialog box.
⑤Snap to grid : By checking the box, you can paint a gradient along the grid.
[Gradient Edit] dialog box
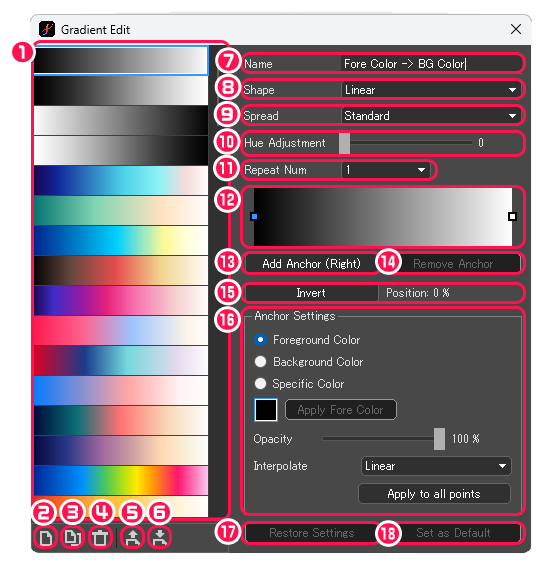
①The list of gradients is shown.
②Add a Gradient : Add new gradient.
③Duplicating a Gradient : Duplicate the selected gradient.
④Remove Gradient : Remove the selected gradient.
⑤Export Gradient to a File : Export the selected gradient as an MDG file.
⑥Import Gradient from a File : Import the MDG file and adds a gradient.
⑦Name : Edit a name for the gradient.
⑧Shape : Choose the shape of gradient from [Linear], [Radial], or [Conic].
⑨Spread : Choose the spread of gradient from [Standard] / [Repeat], or [Reflect].
⑩Hue Adjustment : Change the hue of the selected gradient.
⑪Repeat Num : Specify the number of times to repeat the selected gradient.
⑫The color information of the selected gradient is shown.
⑬Add Anchor (Right) : Add a control anchor to ⑫.
⑭Remove Anchor : Remove a selected control anchor on ⑫.
⑮Invert : Reverse the selected gradient.
⑯Anchor Settings
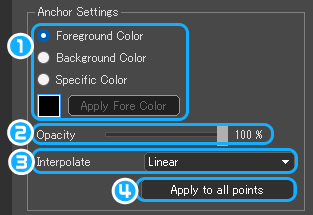
❶Specify the color of the anchor.
❷Opacity : Specify the opacity of the anchor.
❸Interpolate : Specify how to interpolate gradient colors.
❹Apply to all points : The color interpolation method of the selected anchor is applied to all anchors.
⑰Restore Settings : Discard edits.
⑱Set as Default : The edited content will be synchronized as the initial setting of the selected gradient.
Select Tool
This is the function to specify a portion of the active layer and create a selection. When a layer folder is selected, the created selection is for all layers in the folder.
You can add selection by using holding the shift key down, and delete selection by using holding the alt key down.
Tool Options bar

①Specify the selection shape from [Rectangle], [Ellipse], and [Polygon].
②Specify the way to create selection from [New], [Add], [Sub], and [Common].
③Snap to grid : By checking the box, you can create a selection along the grid.
④Anti-aliasing : By checking the box, anti-aliasing is applied to a selection.
⑤RoundCorner : Round the corners of the shape when [Rectangle] or [Polygon] is chosen. You can specify the degree of rounding from the pull-down menu.
⑥Select From Center : By checking the box when [Rectangle] or [Ellipse] is chosen, a selection is created from the center. When the box is not checked, a selection is made from the diagonal.
⑦Constrain Proportions : By checking the box when [Rectangle] or [Ellipse] is chosen, the aspect ratio is fixed at 1:1.
⑧Deselect : When a selection is already created, click to deselect it.
⑨Transform : When a selection is already created, click to transform it; when there in no selection, you can transform the entire image on the active layer.
⑩Free Transform : When a selection is already created, click to transform it freely; when there in no selection, you can transform the entire image on the active layer freely.
⑪Mesh Transform : When a selection is already created, click to mesh-transform it; when there in no selection, you can mesh-transform the entire image on the active layer.
Lasso Tool
This is the function to create a selection from a dragged range.
You can add selection by using holding the shift key down, and delete selection by using holding the alt key down.
Tool Options bar

①Specify the way to create selection from [New], [Add], [Sub], and [Common].
②Anti-aliasing : By checking the box, anti-aliasing is applied to a selection.
③Deselect : When a selection is already created, click to deselect it.
④Transform : When a selection is already created, click to transform it; when there in no selection, you can transform the entire image on the active layer.
⑤Free Transform : When a selection is already created, click to transform it freely; when there in no selection, you can transform the entire image on the active layer freely.
⑥Mesh Transform : When a selection is already created, click to mesh-transform it; when there in no selection, you can mesh-transform the entire image on the active layer.
MagicWand Tool
This is the function to specify a certain area as a selection at a time.
You can add selection by using holding the shift key down, and delete selection by using holding the alt key down.
Tool Options bar

①Reference : Specify the reference for the area of creating a selection from [Canvas], [Active Layer] and [Specified Layer].
②Tolerance : Specify the tolerance value of creating a selection.
③Anti-aliasing : By checking the box, anti-aliasing is applied to a selection.
④Expand : Specify the expansion or contraction of a selection.
⑤Close the gap : By checking the box, the gap in the enclosed area will be closed and a selection is created.
⑥Deselect : When a selection is already created, click to deselect it.
SelectPen Tool
This is the function to create a selection by drawing with a pen. By choosing a brush from the list of [Brush] window, you can create a selection with that brush.
Tool Options bar

①Snap : Choose the type of snap to be used for drawing. Choose [OFF] to stop using it. For more information about how to use snap, please refer to this page.
②Anti-aliasing : By checking the box, anti-aliasing is applied to a selection.
③Deselect : When a selection is already created, click to deselect it.
SelectEraser Tool
This is the function to erase selection with an eraser.
The content of tool-options-bar is same as that of select-pen tool.
Text Tool
This is the function to insert and edit texts.
Clicking the place where you want to insert texts, [Edit Text] dialog box opens and you can edit texts. The texts, which you add, becomes a text layer. It can be re-edited by clicking the gear icon in [Layer] window or by clicking texts on the canvas.
[Edit Text] dialog box
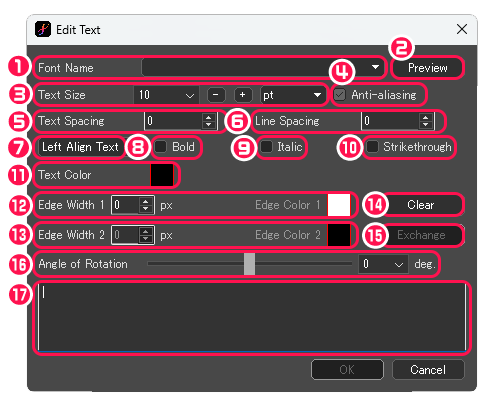
①Font Name : The name of the current font is shown. Fonts beginning with “@” will be written vertically (Windows version only).
②Preview : Click to open a dialog box to see samples of fonts.
③Text Size : Specify the font size with pt or pixel units.
④Anti-aliasing : By checking the box, anti-aliasing is applied to the text.
⑤Text Spacing : Specify the space between characters.
⑥Line Spacing : Specify the space between lines.
⑦Specify the text alignment method from [Left Align Text], [Center Text], and [Right Align Text].
⑧Bold : By checking the box, the text will be bolded (not applicable to some fonts).
⑨Italic : By checking the box, the text will be italicized.
⑩Strikethrough : By checking the box, a strike-through line will appear in the text.
⑪Text Color : Change the color of the text.
⑫Set [Edge Width 1] and [Edge Color 1] to draw a border on the text.
⑬When [Edge Width 1] and [Edge Color 1] are specified, set [Edge Width 2] and [Edge Color 2] to draw a second border.
⑭Clear : Clear the border settings.
⑮Exchange : Swap the color of the two borders.
⑯Angle of Rotation : Specify the rotation angle of the text.
⑰Here input texts.
[Click to Select Font] dialog box
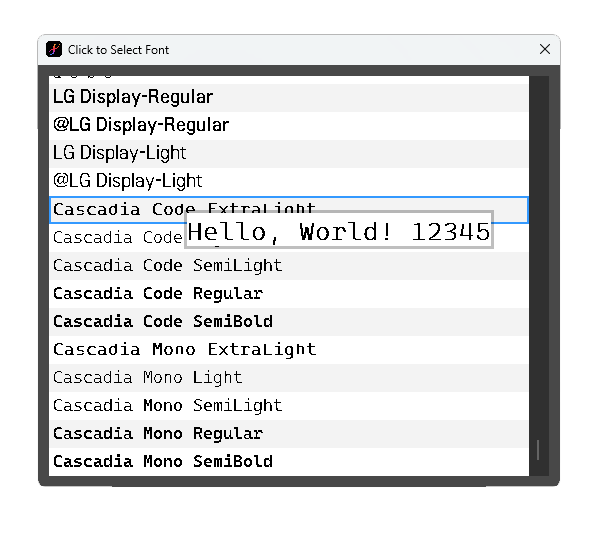
Clicking the preview will synchronize to the [Font Name] field.
Operation Tool
This is the function to edit non-rasterized materials (objects). It can only be used for panel material and 3D-perspective objects.
The selected object can be transformed by moving the bounding box.
①Rotate an object. You cannot use for panel material.
②When there are multiple objects in the same layer, the overlapping order of the objects will be moved one above.
③When there are multiple objects in the same layer, the overlapping order of the objects will be moved one below.
④Delete the currently selected object.
⑤Click to open [Comic Panel Property] dialog box.
[Comic Panel Property] dialog box
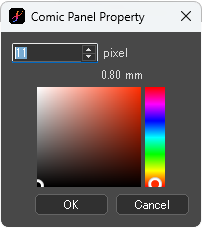
Change the width and the color of the border. Click [OK] to apply changes.
Divide Tool
This is the function to divide frames of a comic.
Before using this function, you must add a frame by clicking [Add Koma Material] in the tool-options bar or by clicking [Layer] > [Add Panel Materia].
Dragging across the border lines divides the frame; holding the shift key down while dragging allows you to divide the frame at any angle.
Tool Options bar

①Specify the space between frames.
②Add Koma Material : Click to open [Comic Panel Property] dialog box.
[Comic Panel Property] dialog box
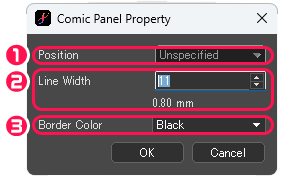
①Position : This can be specified only when [Comic Guide Lines] is turned on. [Inner Frame] places the frame on top of the inner frame, while [Outer Frame] places the frame on top of the outer frame. [Unspecified] places the frame at a fixed ratio that depends on the width of the canvas.
②Line Width : Specify the width of the border from 1 (0.07mm) to 100 (7.26mm).
③Border Color : Specify the color of the border as black or foreground color. If you want to change to another color, click [Layer] > [Material] – [Property] in the menu.
Eyedropper Tool
This is the function to pick up color from the active canvas.
When [Reference] is [Canvas] or [Active Layer], holding the shift key down while using allows you to pick up color from the other reference.
Tool Options bar

①Reference : Specify the reference for the area of picking color from [Canvas], [Active Layer] and [Specified Layer].
②Ignore Layer Color : By checking the box, the layer color of 8-bit and 1-bit layer will be excluded from the target of eyedropper.
③Ignore Draft Layer : By checking the box, draft layer will be excluded from the target of eyedropper.
④Get Transparent Color : By checking the box, you can pick up the transparent color when you use the eyedropper outside the canvas.
⑤Averaging : Choose from [None], [3 * 3 px Average], and [5 * 5 px Average]. When [3 * 3 px Average] or [5 * 5 px Average] is chosen, the color of 9px or 25px around the eyedropper point is averaged.
Hand Tool
This is the function to move the canvas display area.
When clicked, the cursor takes the shape of a gripping hand and you can move the canvas display area.


