This section explains how to see each window.
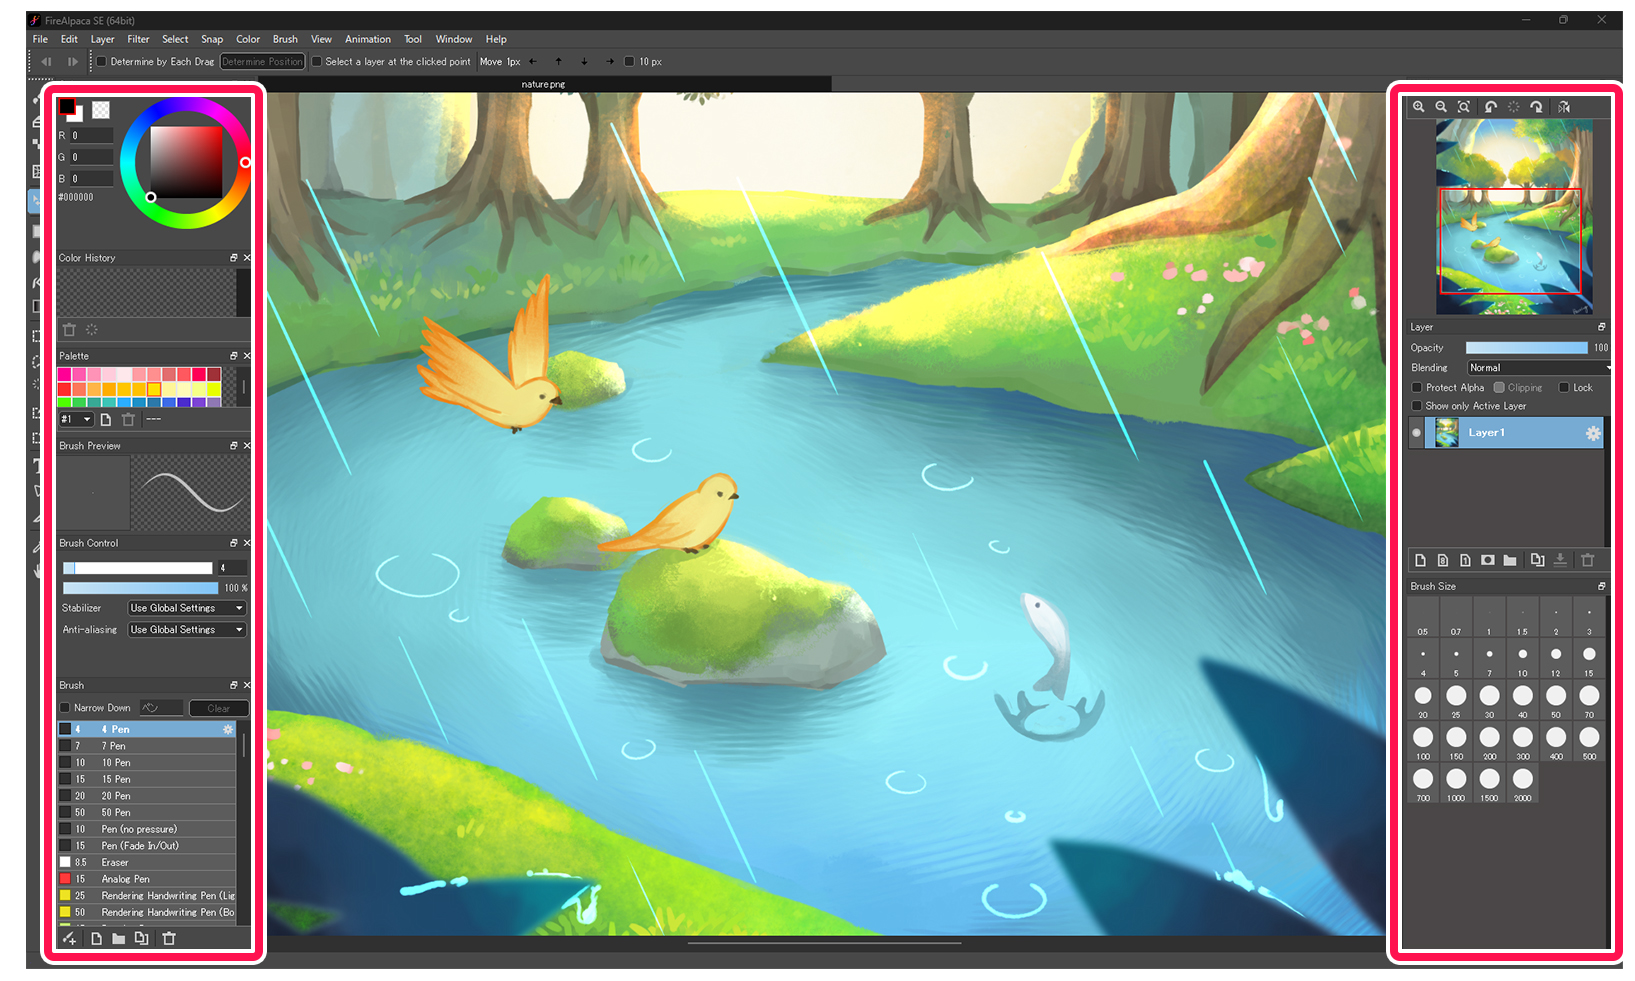
Each window can be set visible/invisible in [Window] menu.
You can also change the order of windows, stack or separate them independently, which allows you to customize screen.
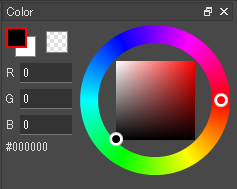
[Color] Window
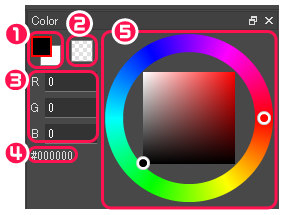
①Foreground color and background color
②Transparent color
③The RGB information of foreground color
④The HEX color code of the foreground color (HEX color codes are RGB values in hexadecimal system)
⑤[Color Bar] or [Color Wheel] (Either the [Color Bar] or [Color Wheel] can be set in [Color] menu)
Color Bar
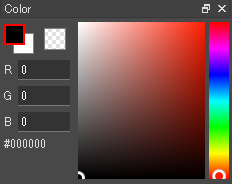
Color Wheel
[Color History] Window
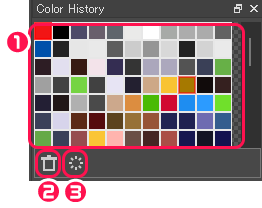
①History of foreground color
②Delete the selected color.
③Delete all history.
[Color Palette] Window
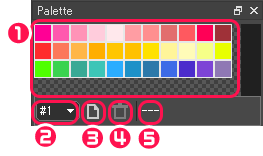
①Colors in the palette group
②Specify the number of the palette group (#1 to #16).
③Open [Add Color] dialog box and add a color to the palette group.
④Delete the selected color.
⑤Display the name of the selected color.
[Add Color] dialog box
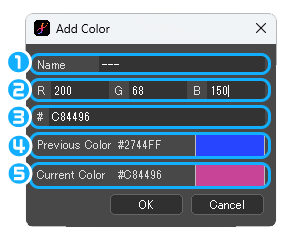
❶Name : Edit the name of the color in the palette.
❷The RGB information of foreground color is shown. The color can be changed by editing the values.
❸The HEX color code of the foreground color is shown. The color can be changed by editing the values.
❹Previous Color : Foreground color information is shown.
❺Current Color : The information about the color that has been edited.
[Brush Preview] Window
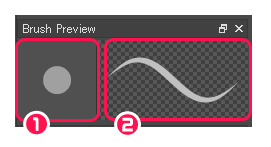
①Preview of the brush size
②Preview of the brush stroke
[Brush Control] Window
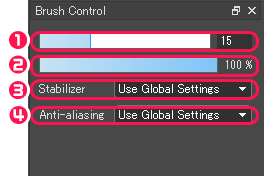
①Adjust the size of the brush.
②Adjust the opacity of the brush.
③Stabilizer : Choose either [Use Global Settings] or individual setting.
④Anti-aliasing : Choose [Use Global Settings] / [Enable] or [Disable].
※Other setting items depend on the brush type. Please refer to this page for more information.
[Brush] Window
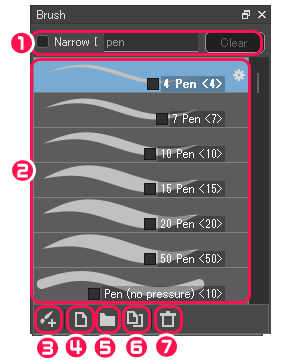
①Check [Narrow] to narrow down the list.
②The list of brushes is shown. Select a brush and right-click to [Export Brush File] / [Import Brush Files]. Clicking the gear icon opens the [Edit Brush] dialog box where you can edit the brush’s settings.
③Show Brush Store (Get a brush) : Open [Brush Store] dialog box.
④Add Brush
-Add Brush : Add a new brush.
-Add Bitmap Brush (File) : Add a brush from locally saved images. Available file format is MDP or PNG.
-Add Bitmap Brush (Layer, Multiple Materials) : Add a brush from the image on multiple layers of the active canvas.
-Add Script Brush (File) : Add a brush from a locally stored BS (Brush Script) format file.
-Add Preset Brush : Add a brush from the preset.
⑤Add Brush Group : Add a brush group to the top of the list in the Brush window. If a brush group has already been, it will be added below it.
⑥Duplicate Brush : Copy the selected brush.
⑦Delete Brush : Delete the selected brush.
[Edit Brush] dialog box
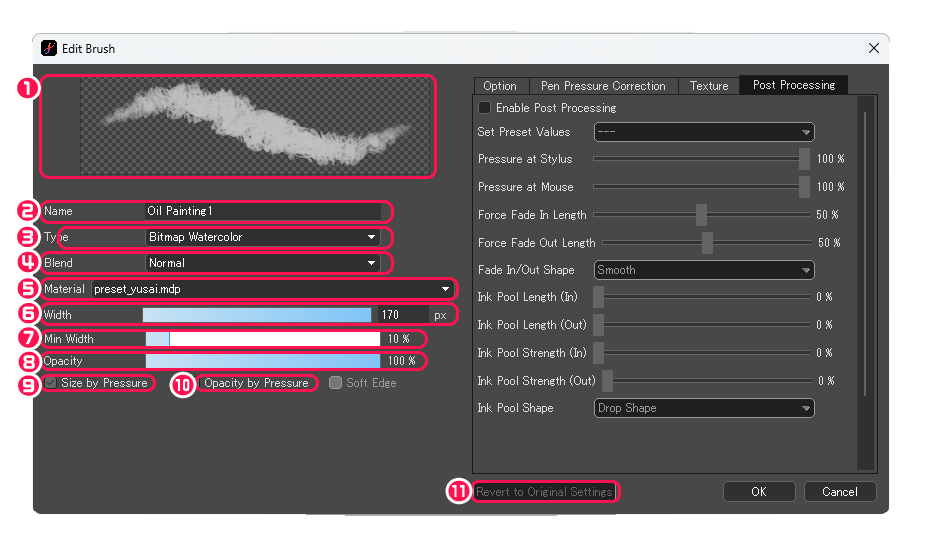
①Stroke preview is shown.
②Name : Edit the name of the brush.
③Type : Choose the brush type from [Pen], [AirBrush], [Eraser], [Watercolor], [Blur], [Smudge], [Edge Pen], [Edge Pen2], or [Mix]. For more information, please refer to this page.
④Blend : When the type is [Pen], [AirBrush], [Watercolor], [Edge Pen], or [Edge Pen2], set the blend effect on the stroke.
⑤Material : When a bitmap brush is selected, you can choose image which is used for stroke.
⑥Width : Adjust the default width.
⑦Min Width : Adjust the minimum width when pen-pressure is applied.
⑧Opacity : Specify the default opacity.
⑨Size by Pressure : By checking this, pen-pressure affects line width.
⑩Opacity by Pressure : By checking this, pen-pressure affects the opacity of line.
⑪Soft Edge : When the type is [Eraser], [Watercolor], or [Mix], by checking this, the edge of stroke blurs.
⑫Revert to Original Settings : Resets the parameters to their default values.
[Option] Tab
Editable items vary by brush type. For more information, please refer to this page.
[Pen Pressure Correction] Tab

Set the value of pen-pressure for the active brush.
[Texture] Tab
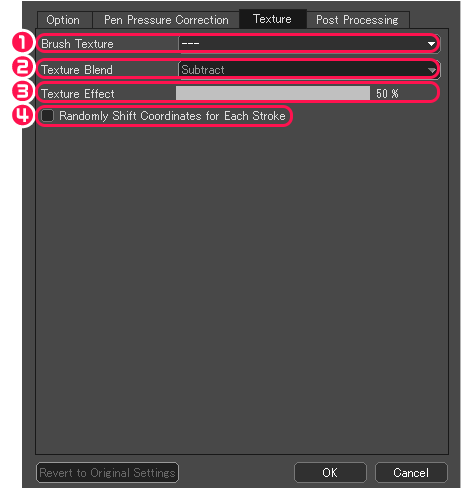
①Brush Texture : Choose the texture which is synthesized with the stroke.
②Texture Blend : Choose the way of blending for texture.
③Texture Effect : Choose texture effect.
④Randomly Shift Coordinates for Each Stroke : By checking this, texture for each stroke will be drawn randomly.
[Post Processing] Tab

①Enable Post Processing : Check this box to turn [Post Processing] on.
②Set Preset Values : Choose from [Force Fade In/Out], [Ink Pool], or [Drawn Lettering] to display the respective preset value.
③Adjust pen-pressure when using stylus or mouse.
④Adjust length and shape of [Force Fade IN/Out].
⑤Adjust length, strength, and shape of the [Ink Pool].
[Navigator] Window
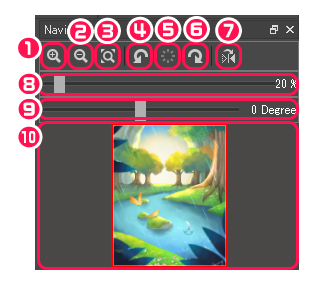
①Zoom In : The active canvas is scaled up by one level.
②Zoom Out : The active canvas is scaled down one level.
③Fit to Window Size : Display of canvas matches the window size.
④Rotate Left : Rotate active canvas 30° to the left.
⑤Clear Rotation : Reset the rotate/flip state of active canvas.
⑥Rotate Right : Rotate active canvas by 30° to the right.
⑦Flip Horizontally : Inverts the display of active canvas from left to right.
⑧Adjust scaling up/down of the canvas with the bar. (Shown when the cursor is hovered over [Navigator] window)
⑨Adjust the angle of the canvas with the bar. (Shown when the cursor is hovered over [Navigator] window)
⑩Indicate with a red frame the area shown in the main window.
[Layer] Window
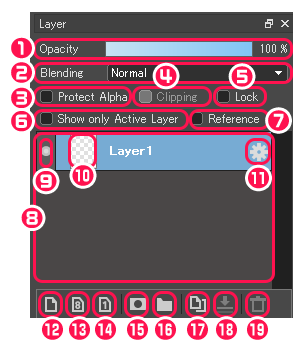
①Opacity : Adjust the opacity of active layer.
②Blending : Choose the blending mode of active layer. For more information about [Blending], please refer to this page.
③Protect Alpha : By checking the box, you cannot draw on transparent area.
④Clipping : By checking the box, the image will be visible only in the part of the bellow layer.
⑤Lock : By checking the box, the layer cannot be edited.
⑥Show only Active Layer : By checking the box, only the image of the active layer is visible.
⑦Reference : Check the box to specify a layer or a layer folder as the reference of bucket, magic-wand and eyedropper tool. You can specify only one at a time, and when specified, a “>>” will appear at the beginning of the name.
⑧The list of layers is shown.
⑨Turn on/off layers display.
⑩The thumbnail of the layer is shown.
⑪Click to open the [Layer Property] dialog box, where you can edit the layer name and various settings.
⑫Add Layer : Add a color layer above the active layer.
⑬Add Layer (8bpp) : Add an 8bit layer above the active layer.
⑭Add Layer (1bpp) : Add a 1bit layer above the active layer.
⑮Add a layer mask to the active layer. Layer mask is a FireAlpaca SE-only function.
⑯Add Layer Folder : Add a layer folder above the active layer.
⑰Duplicate Layer : Copy active layer or layer folder.
⑱Merge Down Layer : Merge active layer with the layer below.
⑲Delete Layer : Delete active layer, layer mask or layer folder.
[Layer Property] dialog box
Color Layer
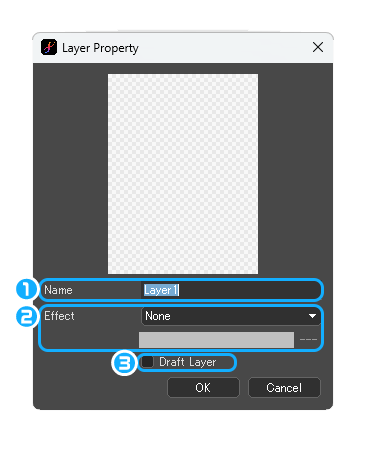
①Name : Edit the layer name.
②Effect : Choose the layer effect from [None], [Watercolor edge], and [Watercolor edge (Cloudy)].
③Draft Layer : Check this box to set as the [Draft Layer], which will not be reflected to [Export] result.
8bit Layer
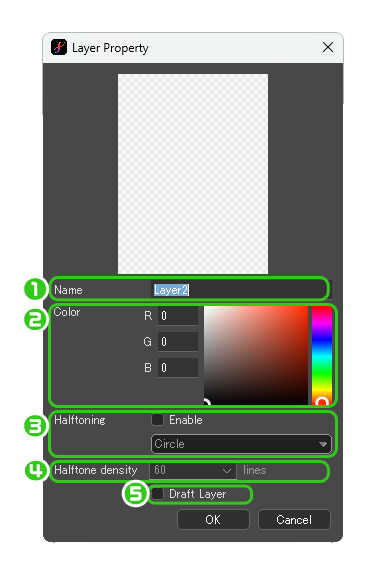
①Name : Edit the layer name.
②Color : Change the layer color.
③Halftoning : By clicking the box, the image will be halftoned. You can choose the halftone shape from [Circle], [Horizontal line], and [Vertical line].
④Halftone density : Specify halftone lines from 10 to 80.
⑤Draft Layer : Check this box to set as [Draft Layer], which will not be reflected to [Export] result.
1bit Layer
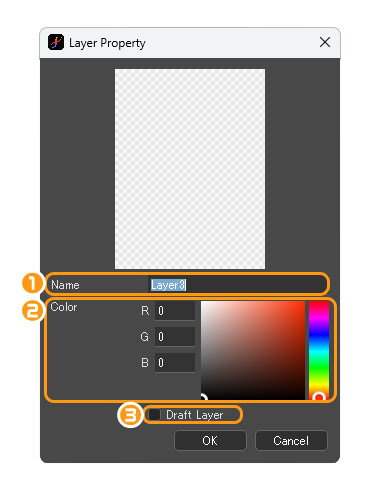
①Name : Edit the layer name.
②Color : Change the layer color.
③Draft Layer : Check this box to set as [Draft Layer], which will not be reflected to [Export] result.
[Reference] Window
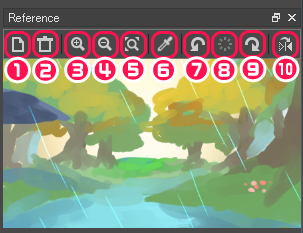
①Set an image in [Reference] window.
②Delete an image from [Reference] window.
③Scale up the image in [Reference] window.
④Scale down the image in [Reference] window.
⑤Fit the image to [Reference] window size.
⑥Once turned on, you can pick up colors from the image in [Reference] window.
⑦Rotate the image in [Reference] window 15° to the left.
⑧Reset rotated/flipped status of the image in [Reference] window.
⑨Rotate the image in [Reference] window 15° to the right.
⑩Flip the image in [Reference] window horizontally.
[Brush Size] Window
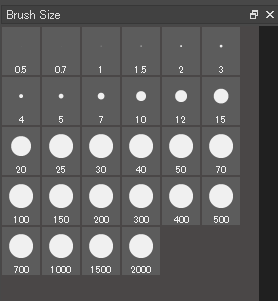
Here the list of brush sizes is shown.
To edit the list, right-click on it and open [Edit Brush Size] dialog box.
[Edit Brush Size] dialog box
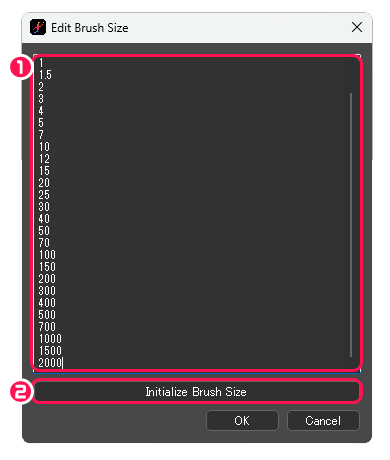
①Edit brush sizes by inputting numbers or deleting items.
②Initialize Brush Size : Initialize the list of [Brush Size] Window.